Last Updated on 1 month ago by Grace Nyambura
NVivo Tutorial for Beginners [Step-by-Step Guide]
| What is NVivo? NVivo is a computer-assisted qualitative data analysis software (CAQDAS) used by PhD students and academic researchers to organize, code, and analyze qualitative data — including interview transcripts, focus group recordings, and open-ended survey responses. It is one of the most widely used qualitative analysis tools in academic research worldwide. |
- NVivo Tutorial for Beginners [Step-by-Step Guide]
- What Is NVivo and Why Use It for Qualitative Research?
- Step 1 — Create Your NVivo 14 Project
- Step 2 — Import Your Interview Transcripts into NVivo
- Step 3 — Code Your Data in NVivo
- Step 4 — Develop Themes from Your Codes
- Step 5 — Visualize Your Data in NVivo
- Step 6 — Export Your Code List from NVivo
- Step 7 — Produce Your Data Analysis Report
- Frequently Asked Questions
- Key Takeaways
You’ve collected your interview data and now you need to analyze it. If you’ve decided to use NVivo 14, you’re in the right place. This NVivo tutorial for beginners walks you through every core step of the software — from setting up your first project to producing a complete qualitative analysis report.
I’m using NVivo 14, the current version of the software. By the end of this guide, you’ll have a solid foundation in the seven essential NVivo functions every researcher needs to know.
Here’s what this tutorial covers:
- Creating your NVivo project
- Importing your interview transcripts
- Coding your data
- Developing themes from your codes
- Visualizing your data in NVivo
- Exporting your code list
- Producing your data analysis report
What Is NVivo and Why Use It for Qualitative Research?
NVivo is one of the most reliable computer-assisted qualitative data analysis (CAQDAS) tools available to academic researchers. It allows you to import raw data, build a structured coding system, group codes into themes, produce visualizations, and export your findings — all within a single project file.
For PhD students working with interview transcripts, focus group recordings, or open-ended survey data, NVivo brings two major advantages: it keeps all your data and analysis in one organized place, and it makes it easy to demonstrate a rigorous, auditable analysis process to your examiners.
If you’re still deciding whether NVivo is the right tool for your research, see my comparison of the 9 best qualitative data analysis software tools — it covers NVivo alongside MAXQDA, ATLAS.ti, and others so you can make an informed choice.
Step 1 — Create Your NVivo 14 Project
When you open NVivo 14, the first thing you’ll do is create a new project. Click the ‘New Project’ button, enter a descriptive project name, and click Next.
NVivo will then ask how you want to save your project. You have two options: autosave, or a manual reminder every 15 minutes. I strongly recommend the second option — the manual reminder. Here’s why:
Several researchers I’ve worked with chose autosave and lost significant work when NVivo encountered an error mid-session. With the reminder option, you’re always in control of when you save, and you can use Ctrl+S to save manually as often as you like. Never rely on autosave alone.

Creating a new project in NVivo 14 for qualitative data analysis

NVivo 14 project save reminder setting — recommended for beginners
Once your project is created, you’ll see two main navigation areas in NVivo:
- Left panel: Files, Codes, Sentiment, Relationships, Cases, Notes, Sets, Visualization, and Reports
- Top menu: File, Home, Import, Create, Explore, Share, and Modules

NVivo 14 left panel and top menu layout for qualitative researchers

NVivo 14 left panel showing Files, Codes, and navigation sections

NVivo 14 top menu with Import, Create, Explore, and Share options
As a beginner, the two sections you’ll use most are the Files area and the Codes area in the left panel. Everything in this tutorial flows through those two sections.

Files and Codes sections in NVivo 14 — the two key areas for beginners
Step 2 — Import Your Interview Transcripts into NVivo
With your project open, go to the Files section in the left panel. Find the transcript file you want to analyze on your computer — NVivo accepts Word documents, PDFs, text files, and other common formats — then drag and drop it directly into the Files section.
That’s all it takes. NVivo imports the document and makes it available for coding. You can import multiple transcripts at once and keep them organized in folders within the Files section.
If you haven’t transcribed your interviews yet, see my guide to the best tools for transcribing interviews — it covers both AI transcription services and manual options so you can choose what fits your budget and accuracy needs.

Interview transcript imported into NVivo 14 Files section
Step 3 — Code Your Data in NVivo
What Is a Code in Qualitative Research?
Before coding, it helps to be clear on what a code actually is. A code is a short, descriptive or interpretive label applied to a segment of your data — a word, sentence, or paragraph — that captures something meaningful in relation to your research question.

Coding is the foundation of most qualitative analysis methods, including reflexive thematic analysis as defined by Braun and Clarke. The codes you generate in this step become the raw material from which your themes emerge.
How to Create and Apply Codes in NVivo
Double-click on your imported transcript to open it. Then go to the Codes section in the left panel — this is where all your codes will live.
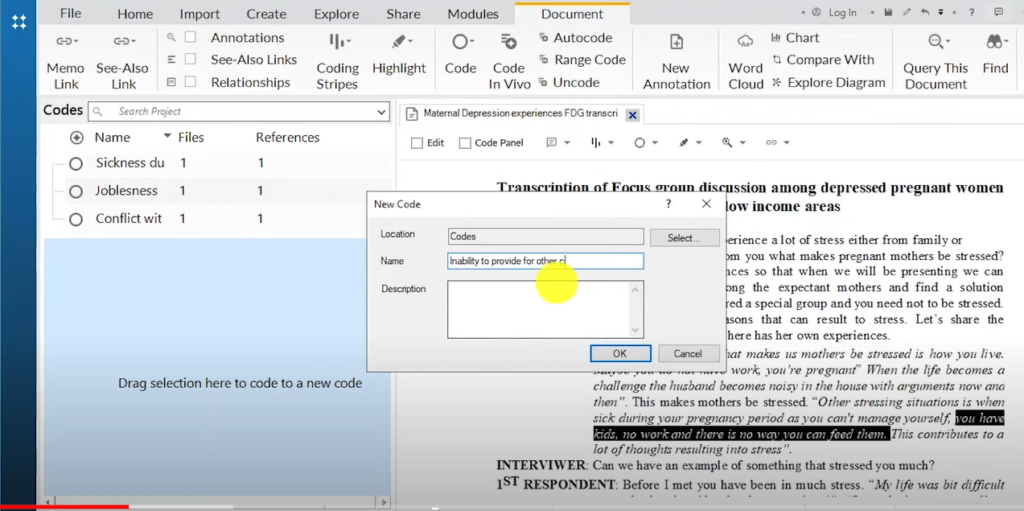
To create a code in NVivo: highlight the text you want to code, then drag and drop the selected text directly into the Codes section. NVivo will prompt you to name the code. Give it a short, descriptive label that captures the meaning of that data segment.
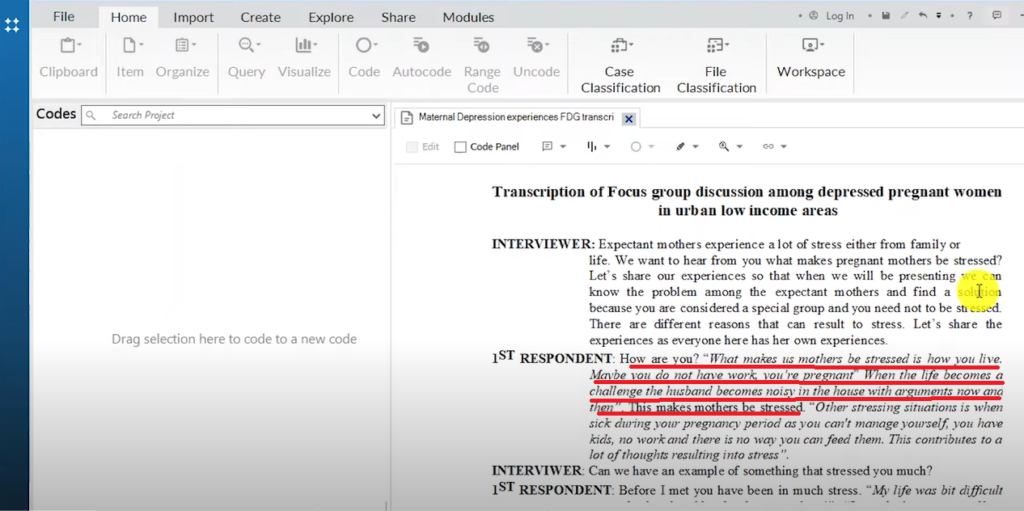
Here’s an example from the dataset I’m using in this tutorial — a focus group discussion among pregnant women in urban low-income areas, exploring the causes of stress during pregnancy:
- “Maybe you do not have work and you are pregnant.” — Coded as: joblessness
- “The husband becomes noisy in the house with arguments now and then.” — Coded as: conflict with spouse
- “Other stressing situations is when sick during pregnancy.” — Coded as: illness during pregnancy
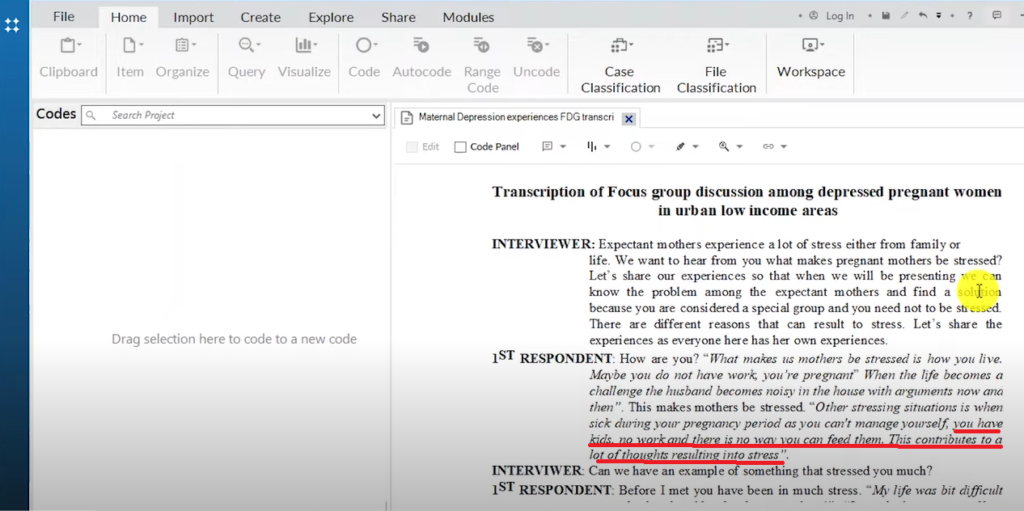
- “You have kids, no work, and there is no way you can feed them.” — Coded as: inability to provide for other children
- “He cannot purchase food or parent. There is nowhere you can go to work.” — Coded as: lack of financial support from spouse
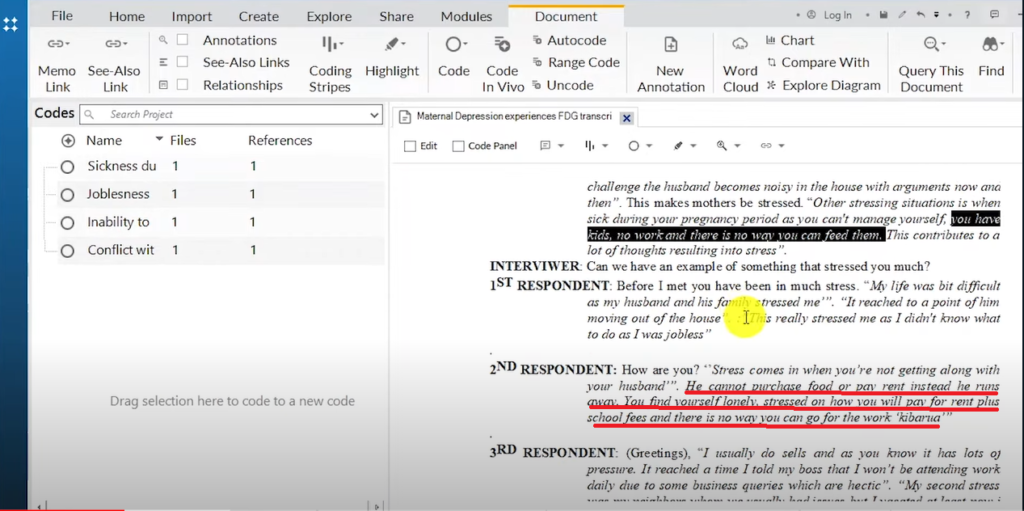
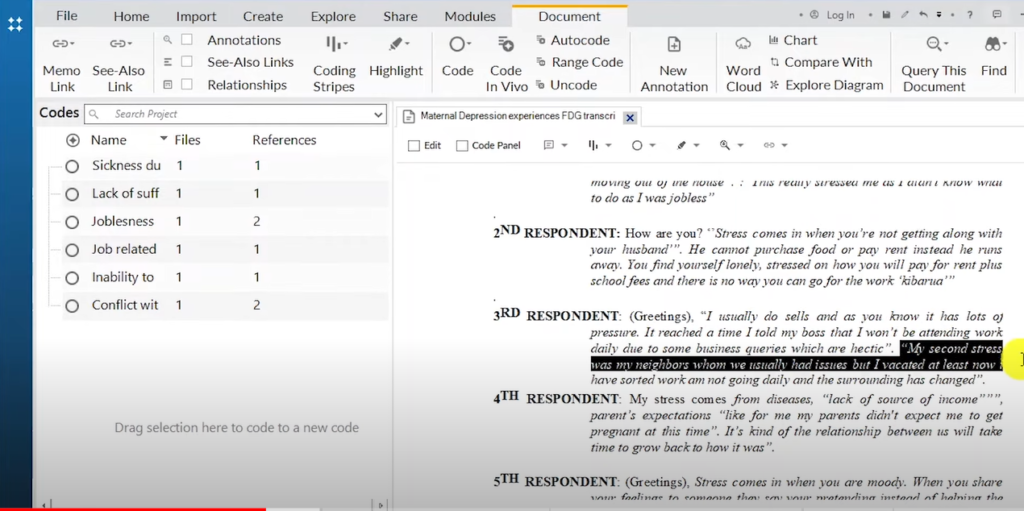
- “My second stress was my neighbours who usually had issues.” — Coded as: poor relationship with neighbours

NVivo 14 Codes section where qualitative codes and themes are organized
A Section of the Transcript

Creating the qualitative code ‘joblessness’ in NVivo 14
A Section of a Transcript in Nvivo 14
The Code Inability to Provide for Other Children is Created
A Section of a Transcript in Nvivo 14
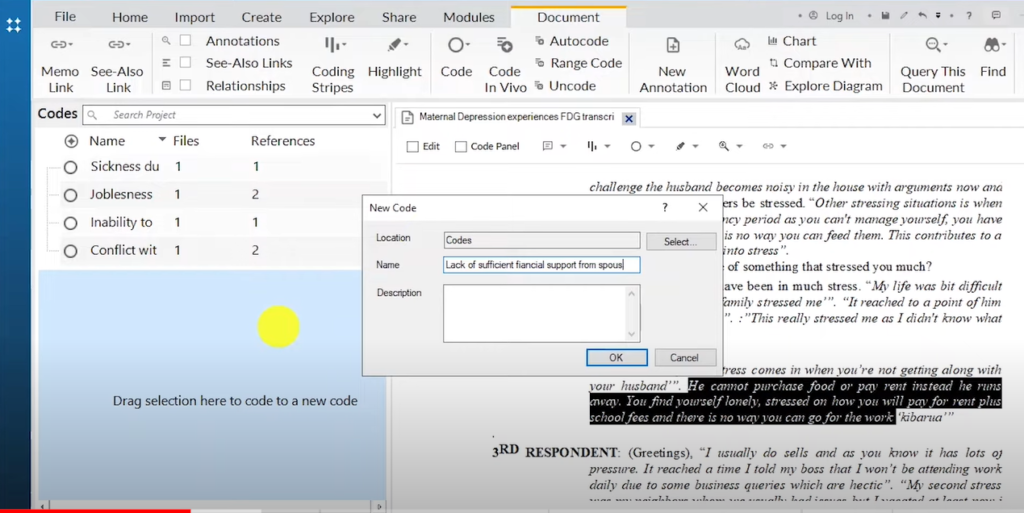
The Code Lack of Sufficient Financial Support from Spouse is Created
A Section of a Transcript in Nvivo 14
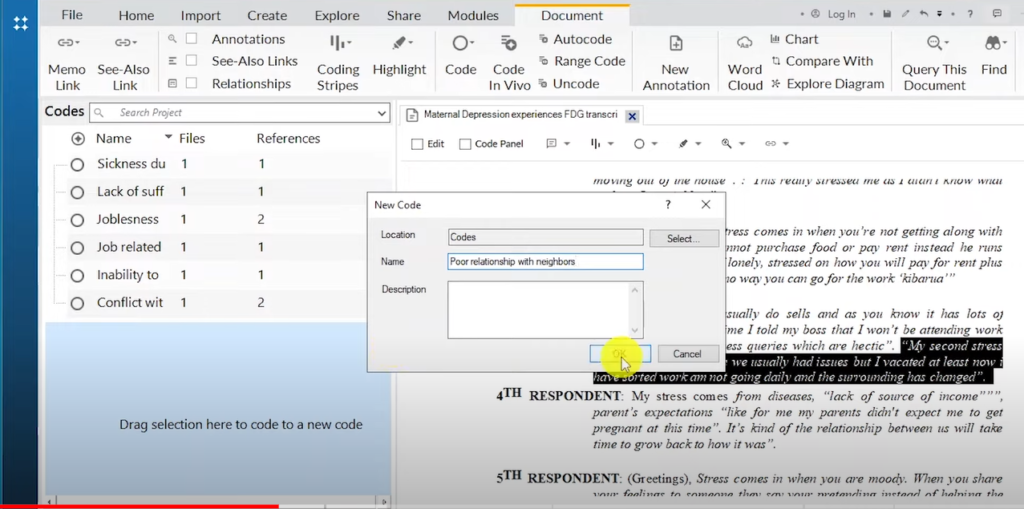
The Code Poor Relationship with Neighbours is Created
A useful NVivo feature: if a new statement supports a code you’ve already created, you don’t need to create a new one. Highlight the text and drag it into the existing code — NVivo adds it as an additional reference, so you can see how many data segments support each code.
You can also rename codes at any time by right-clicking on the code, selecting Code Properties, and editing the name. I renamed ‘sickness during pregnancy’ to ‘illness during pregnancy’ mid-analysis when I realized the latter was more precise.
For a much deeper walkthrough of the coding process with a full research example, see my guide on how to analyze interview transcripts in qualitative research.
Step 4 — Develop Themes from Your Codes
Once you’ve generated your initial codes, the next step is to look for patterns. Codes that share a common meaning are grouped together under a theme. In NVivo, themes are created exactly the same way as codes — right-click in the Codes section, select New Code, and name it as a theme.
The key difference is what you do next: you drag and drop existing codes into the theme, making the theme a parent that organizes its child codes underneath it.
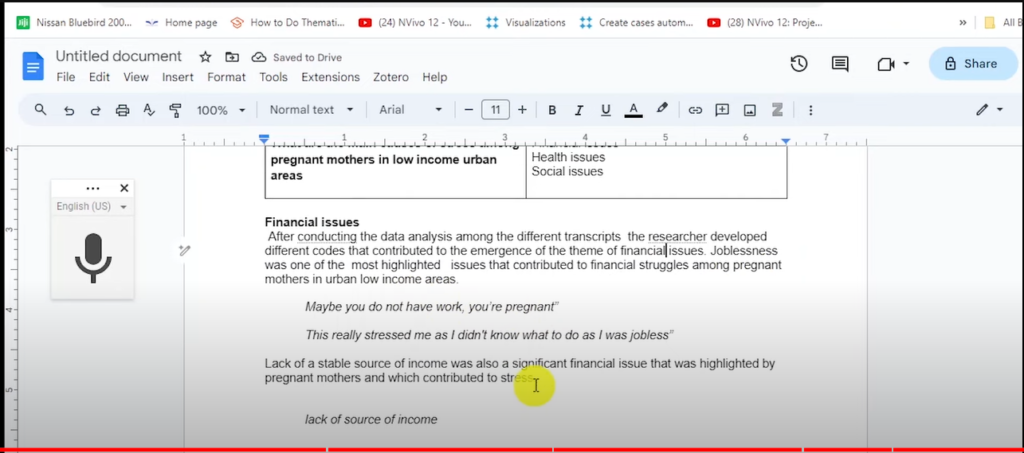
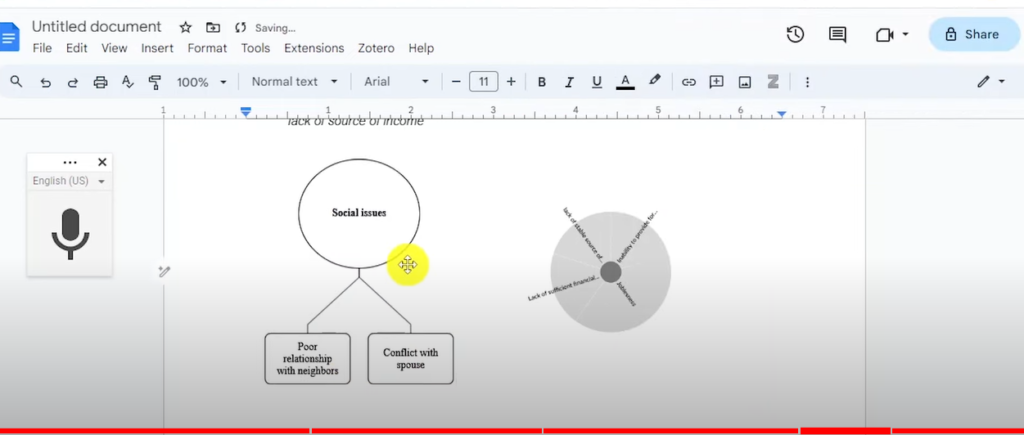
From my coding of the pregnant women dataset, three clear themes emerged:
Health Issues: Illness during pregnancy
Financial Issues: Joblessness, inability to provide for other children, lack of financial support from spouse
Social Issues: Conflict with spouse, poor relationship with neighbours

Creating the theme ‘Financial Issues’ in NVivo 14 thematic analysis

The Codes to be Dragged and Dropped into the Theme Financial Challenges

The Theme Social Issues is Created
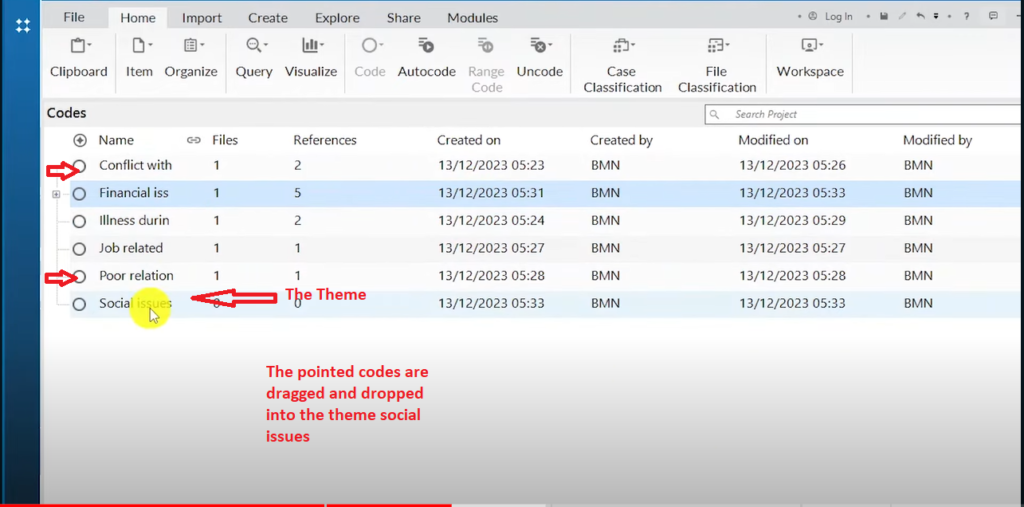
The Two Codes are Dropped into the Theme
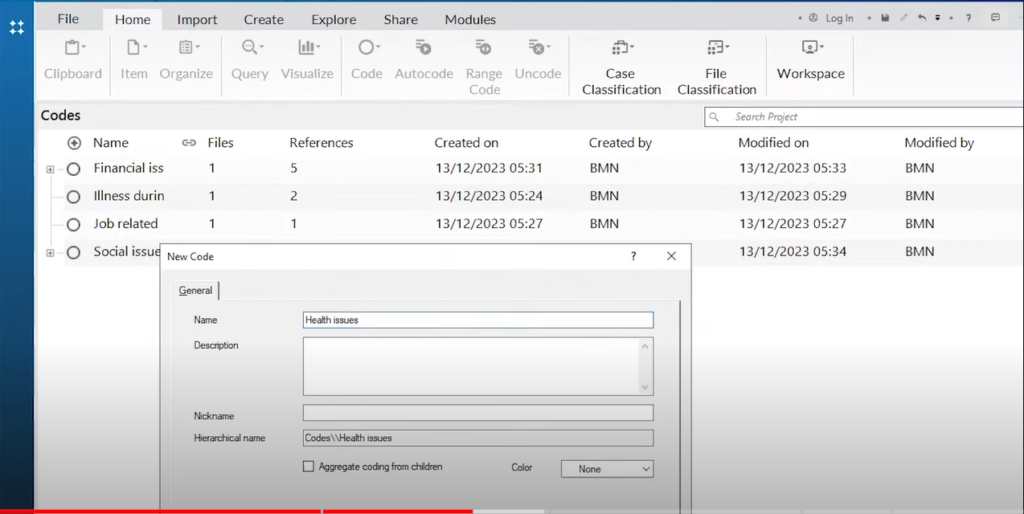
The Theme Health Issues is Created
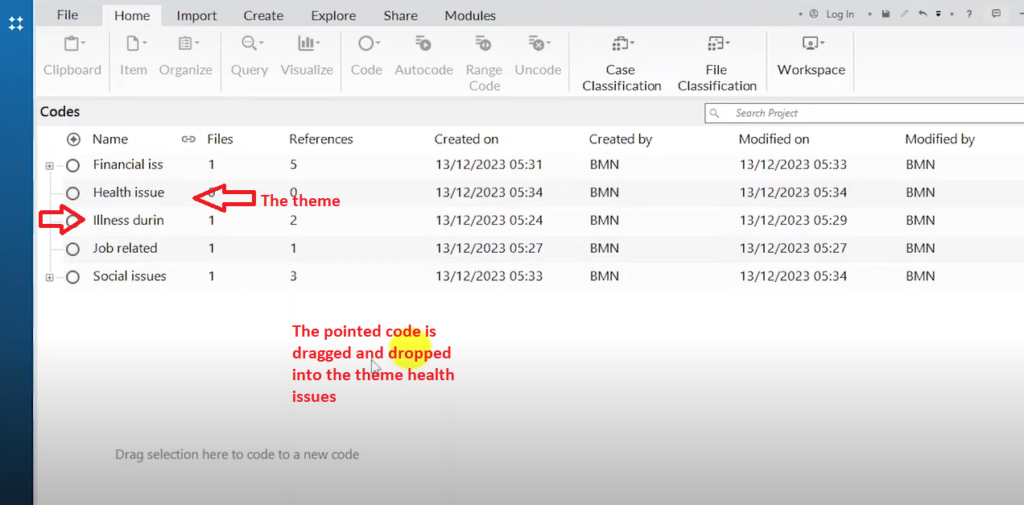
The Code is Dropped into the Theme
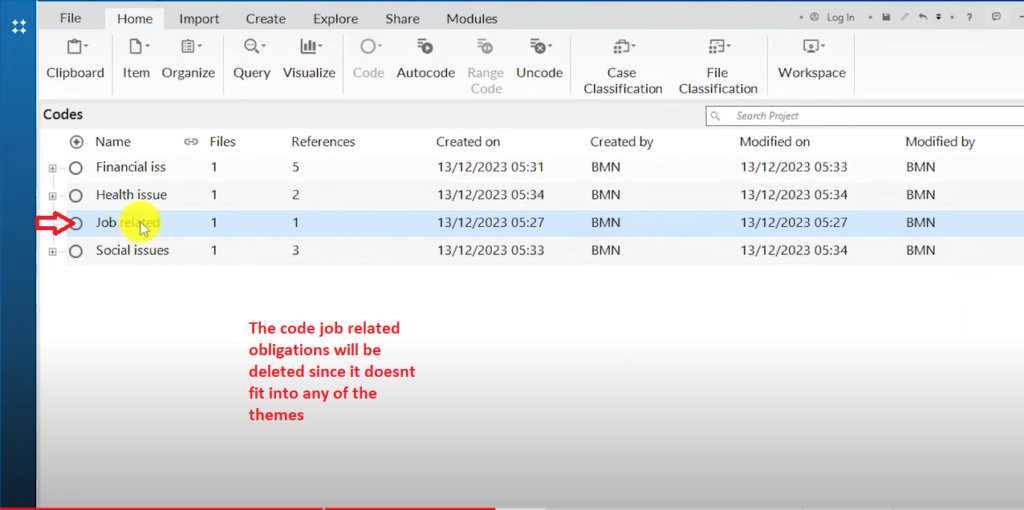
The Code Job Related Obligations is Deleted
This inductive approach — where themes emerge from the codes, rather than being decided in advance — is the hallmark of inductive thematic analysis. The codes lead you to the themes, not the other way around.
For a full explanation of both inductive and deductive approaches, including worked examples, see my guide on inductive and deductive thematic analysis
Step 5 — Visualize Your Data in NVivo
NVivo has several built-in visualization tools that help you understand your data and produce visuals for your analysis report. Here are the two most useful ones for beginners:
Hierarchy charts (tree maps, sunbursts): Right-click on any theme in the Codes section, go to Visualize, and select ‘Hierarchy Chart of Codes’. NVivo generates a tree map by default. Click the dropdown at the top to switch to a sunburst view. To drill down further, click inside the sunburst to see the hierarchy chart for individual codes. Press Ctrl+Shift+E to save the chart to a folder.
Tree map visualization of qualitative themes in NVivo 14

Sunburst chart showing qualitative code hierarchy in NVivo 14

Hierarchy chart of NVivo 14 themes and codes for qualitative analysis report
Mind maps: Right-click on any theme, go to Explore → Maps → Mind Maps. NVivo generates a mind map showing the theme and all its associated codes. This is particularly useful for methodology chapters and appendices where you need to illustrate your analytical process visually.
Both chart types can be exported and inserted directly into your Word-based analysis report.
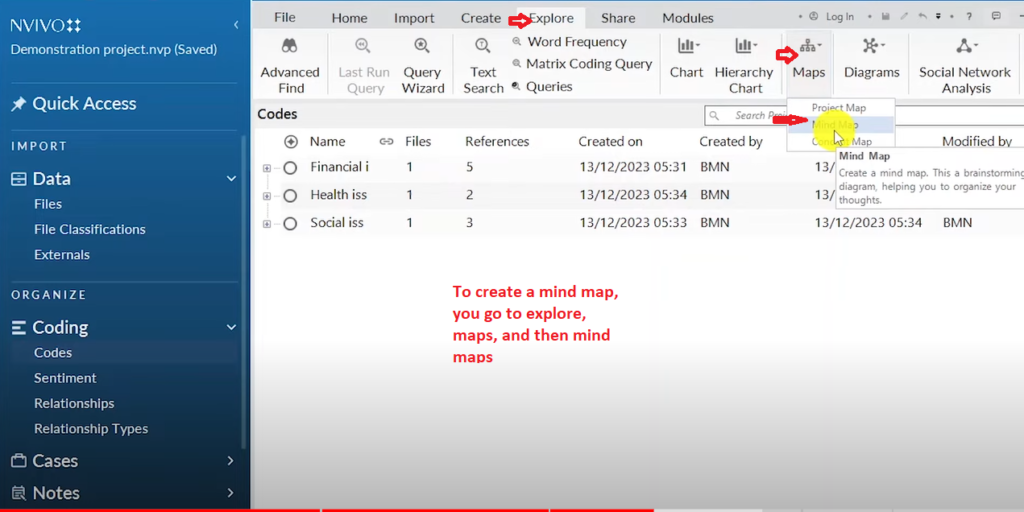
The Creation of a Mind map Process

Mind map of qualitative themes generated in NVivo 14
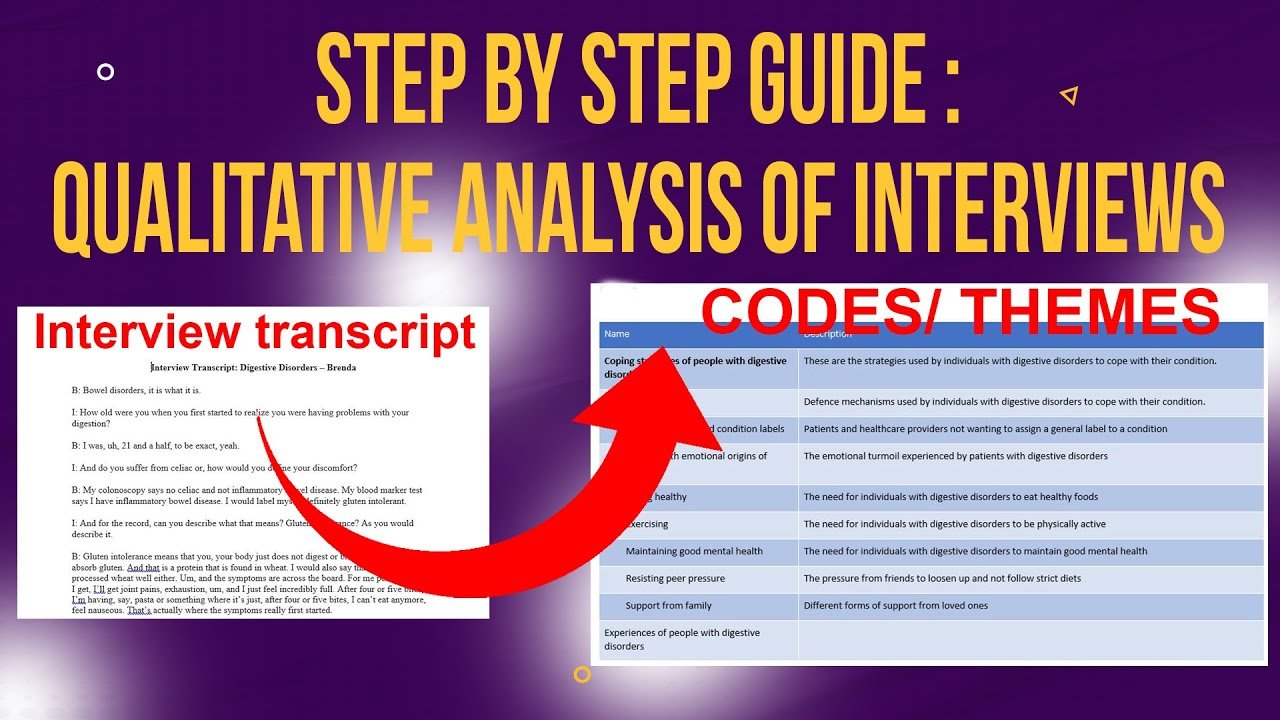
Step 6 — Export Your Code List from NVivo
Your code list — a table showing all your themes and codes — is an important element of your analysis report. It demonstrates the breadth of your coding and shows how your themes were built.
To export it: go to the Codes section, press Ctrl+A to select all codes and themes, then right-click → Export → Export List. NVivo exports an Excel file containing all your themes and codes, which you can copy and paste directly into your report as a formatted table.

Exported code list from NVivo 14 showing themes and codes for analysis report
Step 7 — Produce Your Data Analysis Report
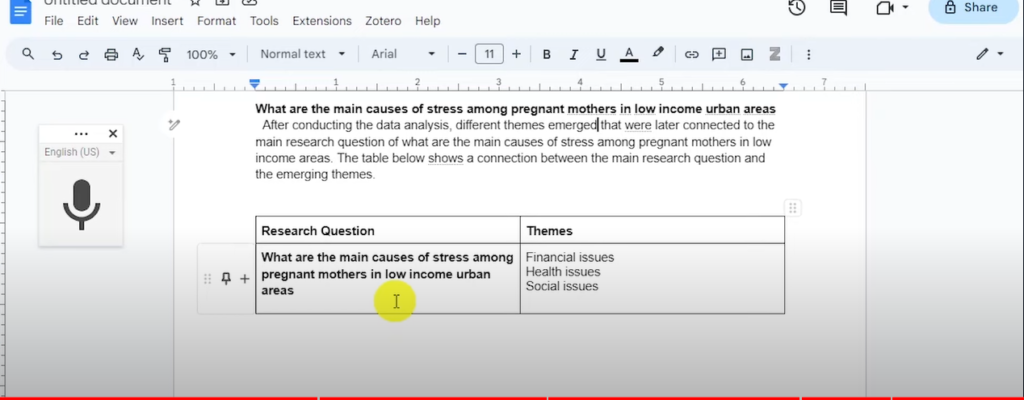
With your codes, themes, visualizations, and exported lists in hand, you’re ready to write up your findings. A qualitative data analysis report produced from NVivo typically includes:
- Data analysis process description: Explain the approach you followed — for example, that you used inductive thematic analysis following Braun and Clarke’s framework. This section goes in your methodology chapter.
- Code and theme table: The exported Excel table showing your initial codes and the themes they belong to.
- Visualizations: Hierarchy charts and mind maps illustrating your theme structure.
- Thematic narrative: A discussion of each theme, supported by direct quotes from your transcripts. This is the core of your findings chapter.
Report Part 1
Report Part 2
A Hierarchy Chart and a Mind Map
For a detailed walkthrough of how to write up your findings after running a full NVivo analysis, see my step-by-step guide on thematic analysis of interviews in NVivo
Frequently Asked Questions
Is NVivo free to use?
NVivo is not free — it requires a paid licence. However, Lumivero (the company behind NVivo) offers a free trial version that gives you access to the full software for a limited period. Many universities also provide NVivo licences to students through their IT departments, so check with your institution before purchasing.
What types of data can I analyze in NVivo?
NVivo supports a wide range of qualitative data types including interview transcripts (Word or PDF), focus group recordings, survey responses, field notes, images, audio, and video files. For most PhD students, the primary use case is coding and analyzing written transcripts.
What’s the difference between a code and a theme in NVivo?
A code is a short descriptive label attached to a specific segment of your data. A theme is a higher-level pattern that groups several codes together because they share a common meaning. In NVivo, both are stored in the Codes section, but themes act as parent folders containing their associated codes as children.
Can I use NVivo for deductive thematic analysis?
Yes. While this tutorial demonstrated inductive coding — where themes emerge from the data — NVivo also supports deductive analysis, where you start with a predefined set of codes based on theory or prior research. For a full walkthrough of the deductive approach, see my guide on deductive coding in NVivo.
How do I know when I’ve coded enough of my data?
A common benchmark is thematic saturation — the point at which new data segments stop producing new codes or revealing new patterns. In practice, for most PhD studies with 8–15 interview participants, you’ll typically reach saturation after working through most of your transcripts. Keep coding until new interviews are not adding any new codes to your list.
Do I need prior experience with qualitative research to use NVivo?
No prior NVivo experience is needed — this tutorial is designed for complete beginners. However, it helps to have a basic understanding of qualitative research methodology before you start. Scribbr’s guide to qualitative research is an excellent starting point if you’re new to the field.
Key Takeaways
- NVivo 14 is a CAQDAS tool designed to help researchers organize, code, and analyze qualitative data from interview transcripts and other sources
- Always use the manual save reminder option when creating your project — autosave has caused data loss for multiple researchers
- The two most important areas in NVivo for beginners are the Files section (where transcripts live) and the Codes section (where codes and themes are built)
- Codes are descriptive labels for data segments; themes group codes that share a common meaning — themes contain codes, not the other way around
- NVivo’s hierarchy charts and mind maps can be exported directly for use in your methodology chapter and findings report
- Export your full code list (Ctrl+A → right-click → Export → Export List) to produce a table of themes and codes for your analysis report
If you’d prefer expert support for your analysis, I offer a done-for-you NVivo thematic analysis service for PhD students and academic researchers. Or explore more free NVivo tutorials on the Surviving Research YouTube channel.

Pingback: Thematic Analysis of Interviews in NVivo [Step-by-Step Guide] -