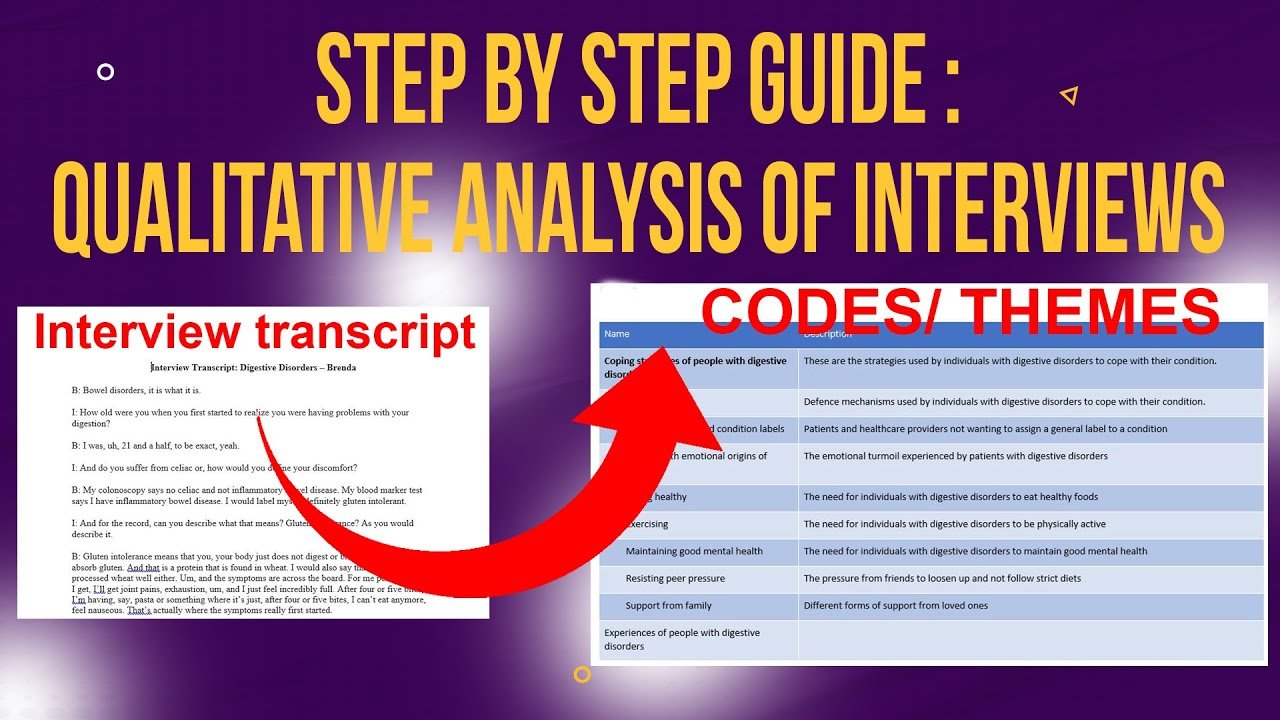

You’ve finished your interviews. Your transcripts are ready. And now you’re sitting in front of NVivo on your Mac — staring at the screen with no idea where to begin.
You’re not alone. And here’s something important: if you’ve been following Windows-based NVivo tutorials (which is about 90% of what exists on YouTube), you’re working against yourself. The logic of NVivo is the same on Mac and Windows, but the interface is different — the menus are in different places and the workflow has key distinctions.
This guide solves that problem. I’ll walk you through exactly how to analyze qualitative interview data in NVivo for Mac, step by step, using thematic analysis as the framework.
- Why NVivo for Mac Is Different from Windows
- How to Download and Install NVivo for Mac
- Setting Up Your First NVivo Project on Mac
- Importing Your Interview Transcripts
- Understanding Thematic Analysis: The Braun & Clarke Framework
- How to Code Interview Data in NVivo for Mac (Step by Step)
- What Comes Next: From Codes to Themes
- Frequently Asked Questions
- Key Takeaways
- Need Help With Your Analysis?
Why NVivo for Mac Is Different from Windows
Most NVivo tutorials online assume you’re on Windows. But if you open those tutorials on your Mac, you’ll get lost fast — not because you’re doing it wrong, but because the interface simply looks different.
On Mac, the toolbar layout, the right-click menus, and even how codes are organized after you create them all behave differently. This tutorial covers the Mac-specific workflow from start to finish so you don’t have to guess.
How to Download and Install NVivo for Mac
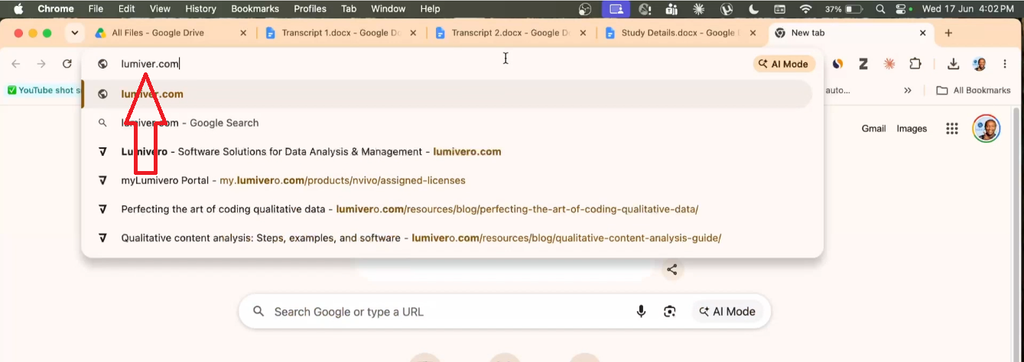
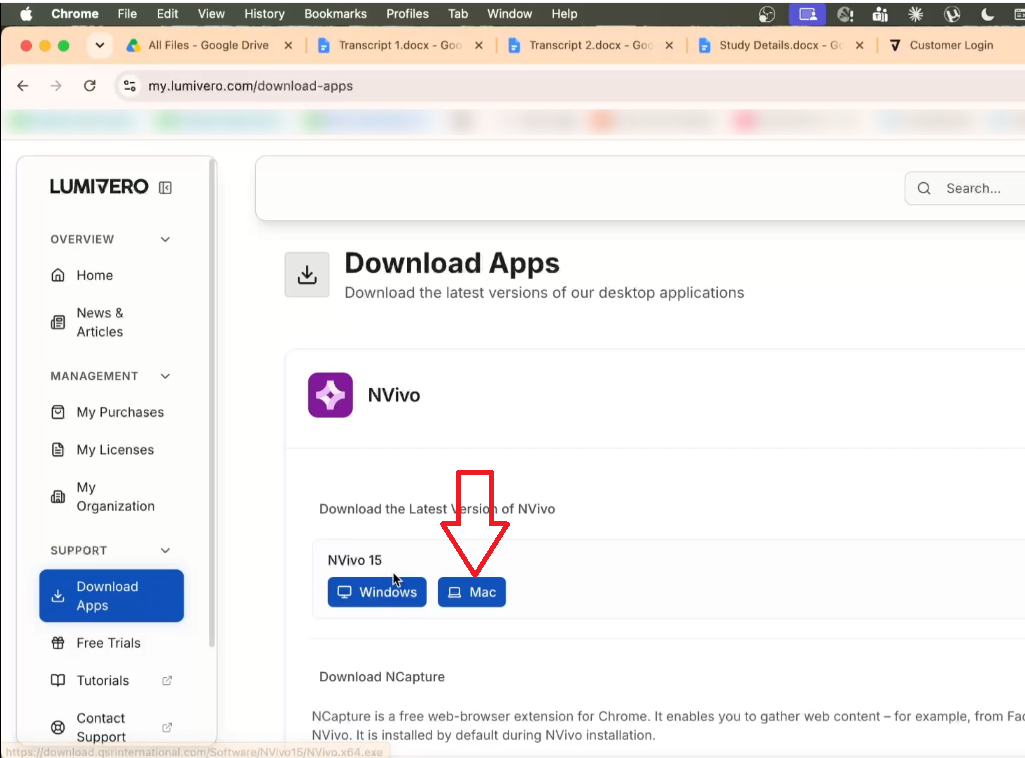
To get NVivo for Mac, go to lumivero.com. Sign in to your account, navigate to your downloads, and select NVivo 15 for Mac. Once downloaded, install it the same way you would any Mac application.
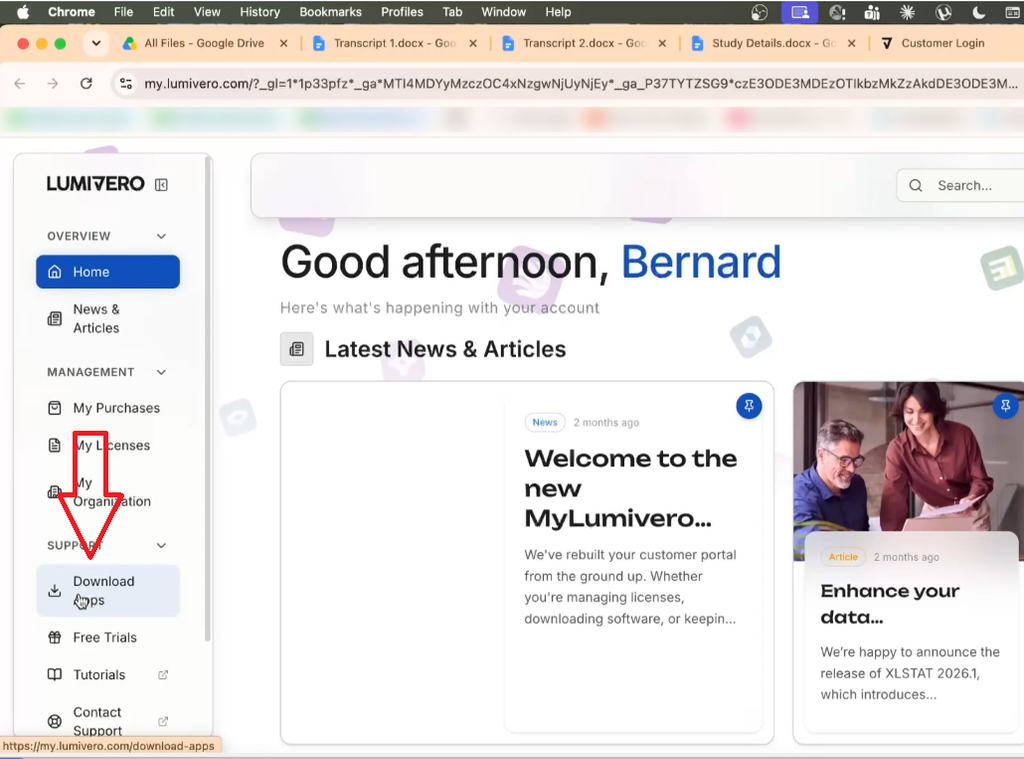
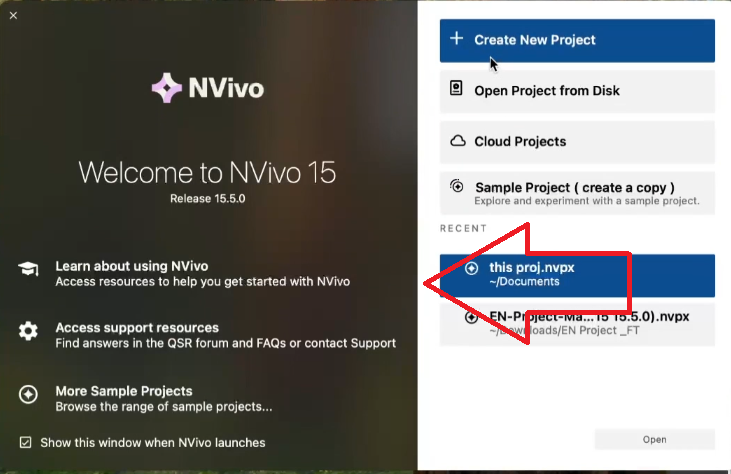
When you open NVivo for the first time, you’ll see a welcome screen. From here, you’re ready to set up your first project.
Setting Up Your First NVivo Project on Mac
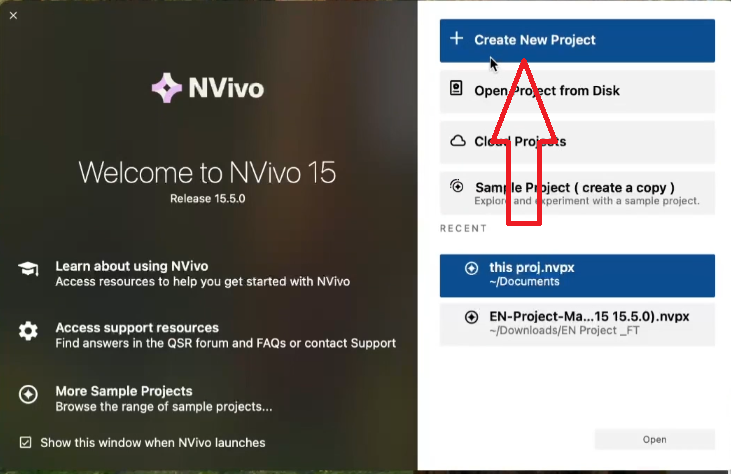
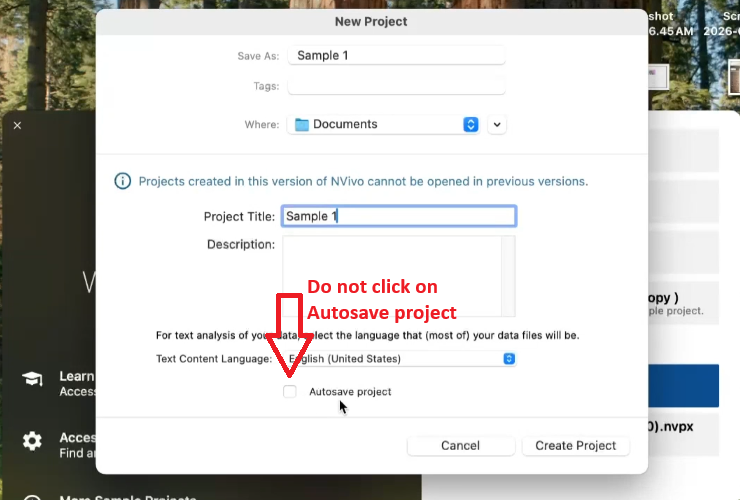
Click Create New Project. Give your project a clear name — I recommend something related to your study rather than a generic name like “Sample 1.” Make sure the name matches in both the project name field and the Save As field.
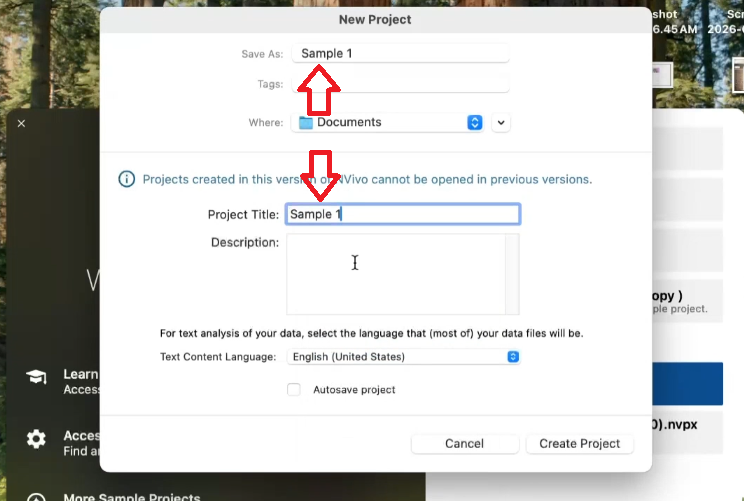
One important setting: I recommend turning off autosave and manually saving with Command + S throughout your session. Autosave can sometimes behave unpredictably in NVivo for Mac, and manual saving gives you more control.
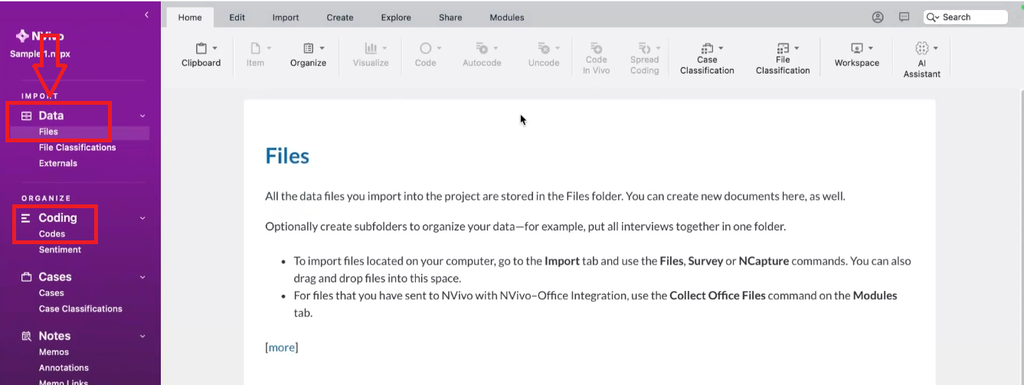
Once inside NVivo, you’ll notice several menus. For thematic analysis, you only need two sections:
- Files — found in the Data section, where you import your transcripts
- Codes — found in the Coding section, where all your codes will live
Importing Your Interview Transcripts
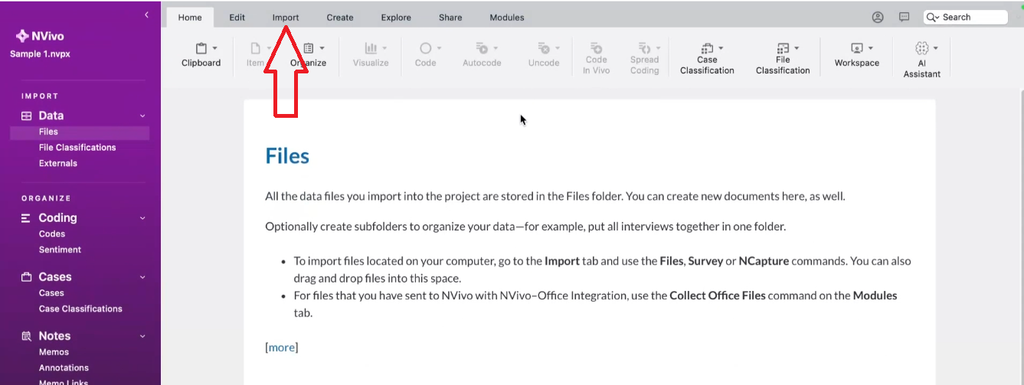
Go to the Files section and click Import Files. NVivo accepts Word documents (.docx) as transcript files. Select your transcript files from your downloads or documents folder and click Import.
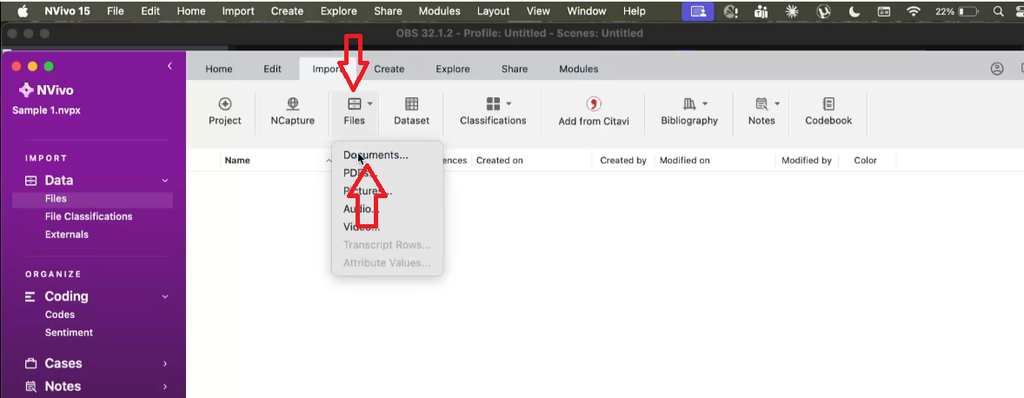
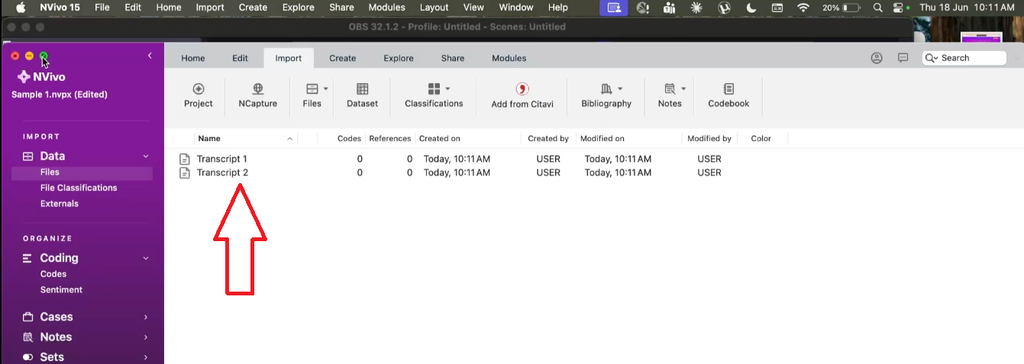
Once imported, your transcripts appear in the Files panel. Double-click any transcript to open it. This is where you’ll begin the first step of thematic analysis: familiarizing yourself with the data.
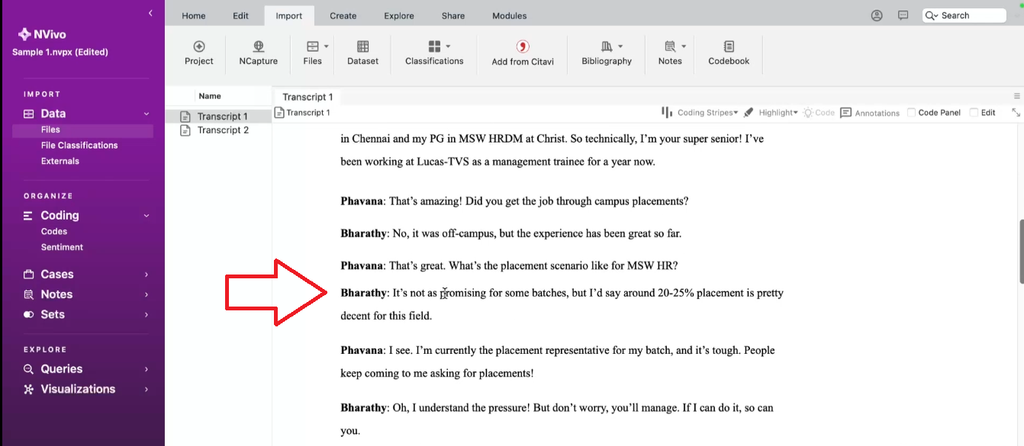
Before you code anything, read through the entire transcript. Understand the study context, the research questions, and what your participants were asked. You can only code meaningfully once you understand what you’re looking for.
Understanding Thematic Analysis: The Braun & Clarke Framework
Thematic analysis is a qualitative research method that involves identifying, analyzing, and interpreting patterns of meaning across your data. It’s one of the most widely used approaches in qualitative research.

The most widely used framework for thematic analysis comes from Braun and Clarke’s 2006 paper in Qualitative Research in Psychology. Their six-step process is:
- Familiarize yourself with the data
- Generate initial codes
- Search for themes
- Review themes
- Define and name themes
- Produce the report
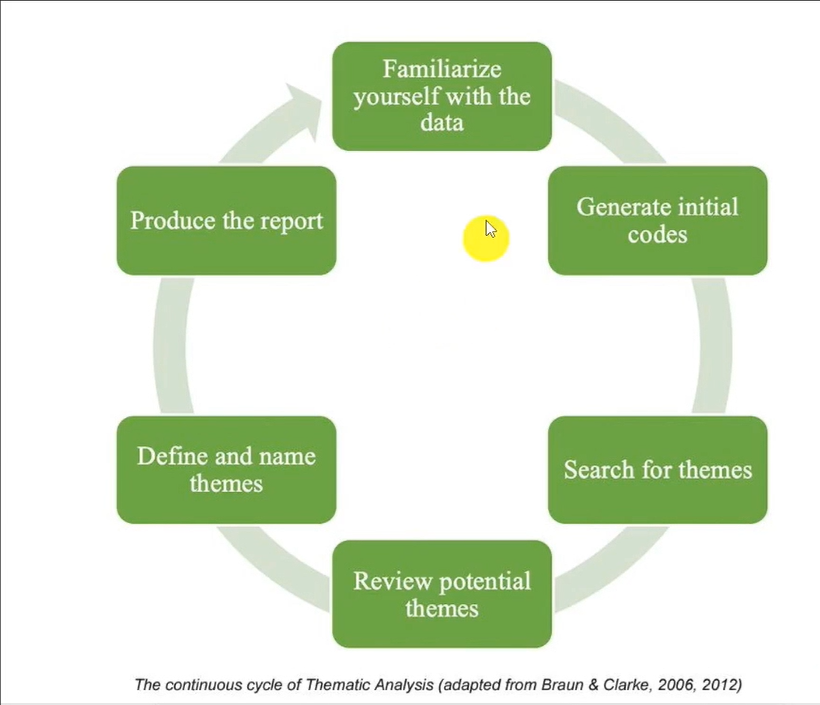
In this tutorial, we’ll focus on Steps 1 and 2 — familiarization and initial coding.
Steps 3–6 are covered in Part 2. If you want to understand how thematic analysis fits into broader qualitative research methods, Scribbr’s guide to thematic analysis is a solid reference to read alongside this tutorial.
How to Code Interview Data in NVivo for Mac (Step by Step)
A code is an interpretive label you apply to any section of your data that is meaningful to your research question. You don’t code everything — only the segments that connect to what your study is exploring.

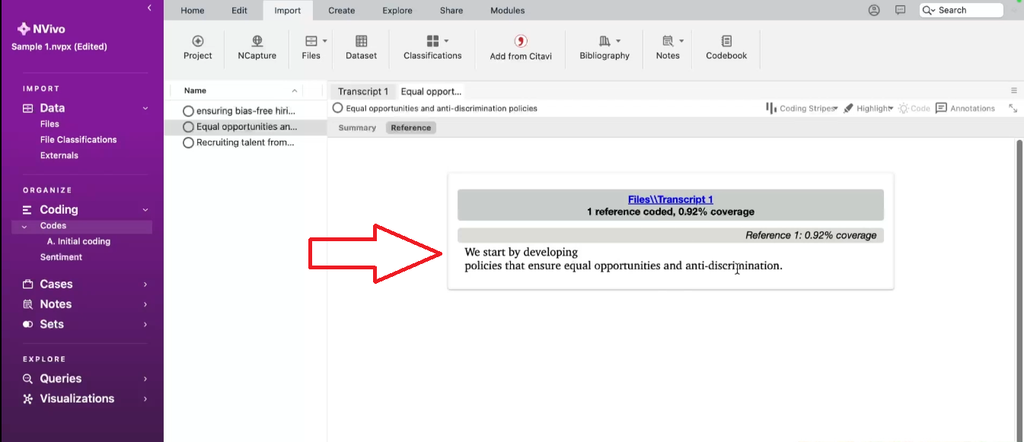
For example, in a study about diversity, equity, and inclusion (DEI) in manufacturing organizations, a participant saying “We start by developing policies that ensure equal opportunities and anti-discrimination” would receive a code like: Equal opportunities and anti-discrimination policies.
Here’s the step-by-step coding process in NVivo for Mac:
Step 1 – Highlight and Create a New Code
Highlight the section of text you want to code. Right-click on your Mac (two-finger click on trackpad).
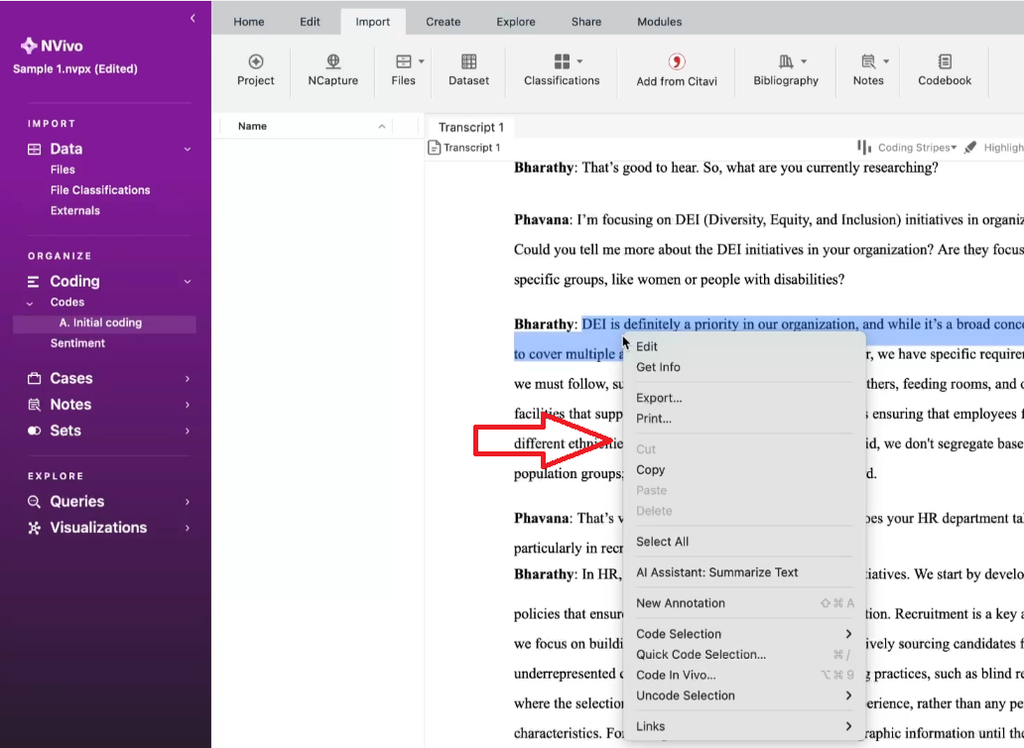
Then select Code Selection → New Code.
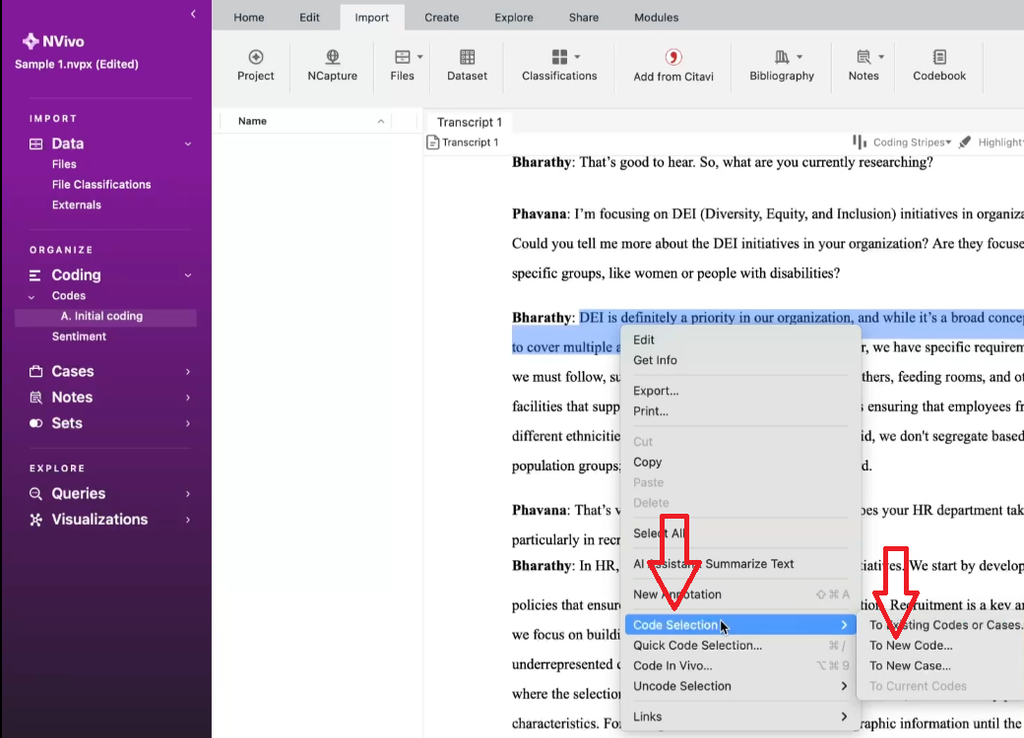
Type your interpretation as the code name. You can also use voice typing on Mac for faster coding.
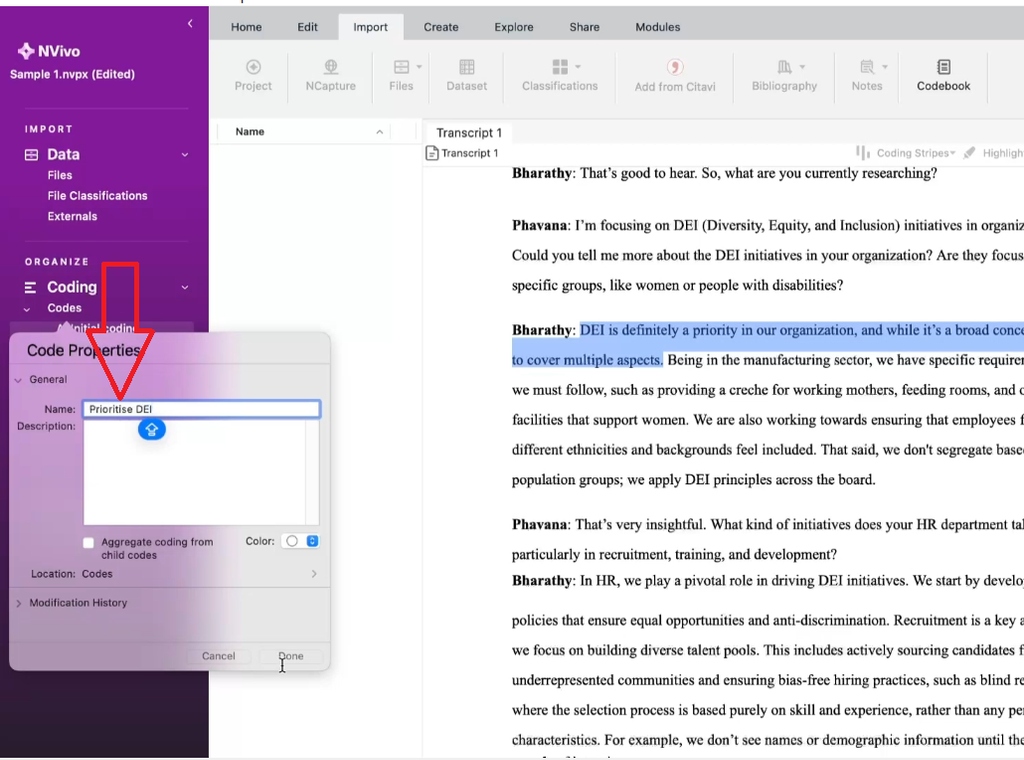
Click Done. Here’s the key Mac difference: on Windows, a new code goes directly into whatever folder you’re working in. On Mac, the code drops into the main Codes folder.
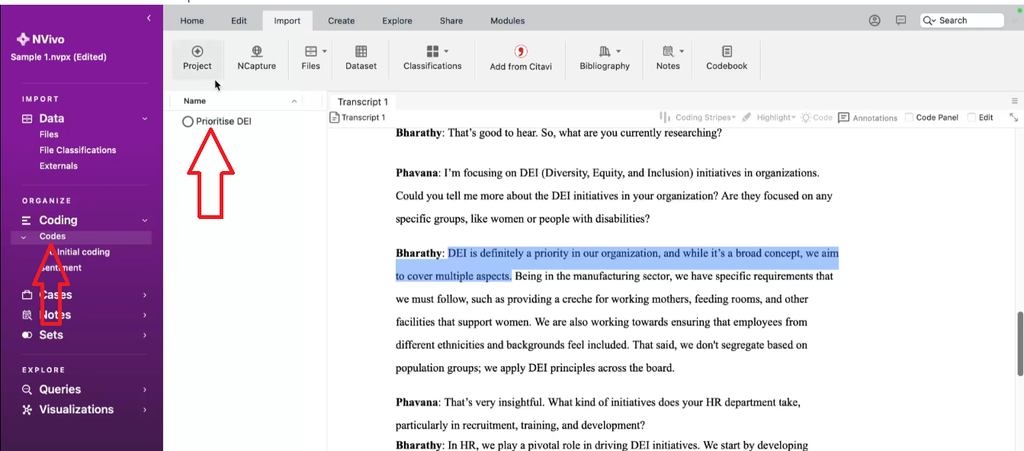
You’ll need to drag and drop it into your target folder manually.
Step 2 – Use Color Coding to Track Question Sources
When you’re coding across multiple interview questions, colors help you track which codes came from which question. For example:
- Question 1 codes → Maroon
- Question 2 codes → Blue
- Question 3 codes → Orange
To apply a color, right-click a code, go to Color, and select your chosen color.
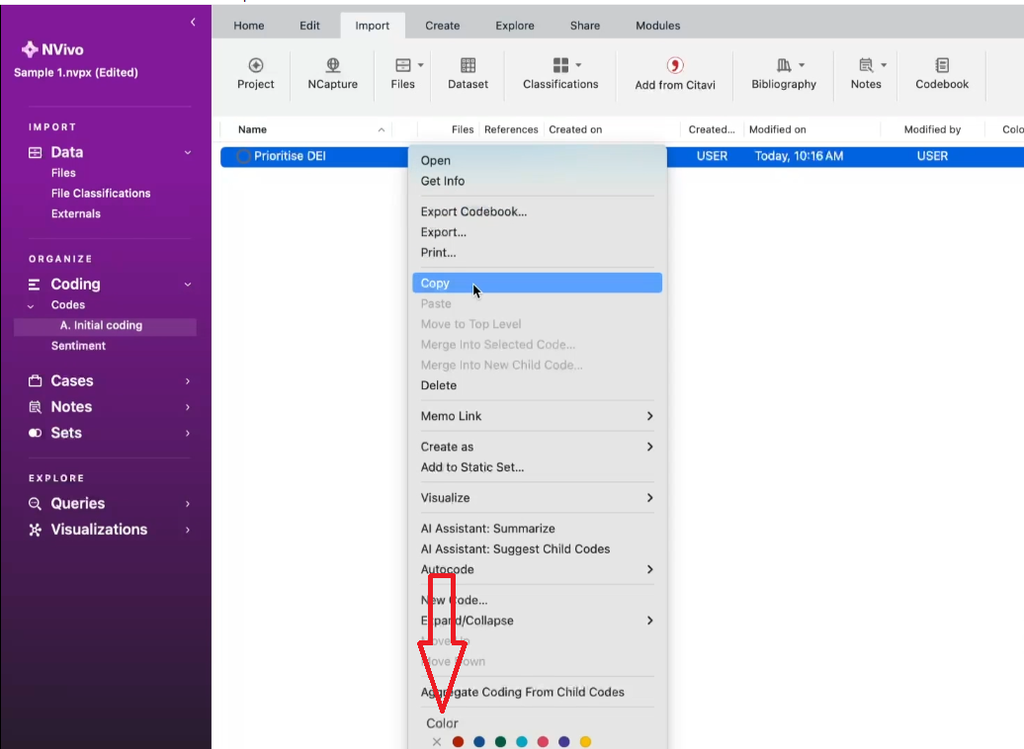
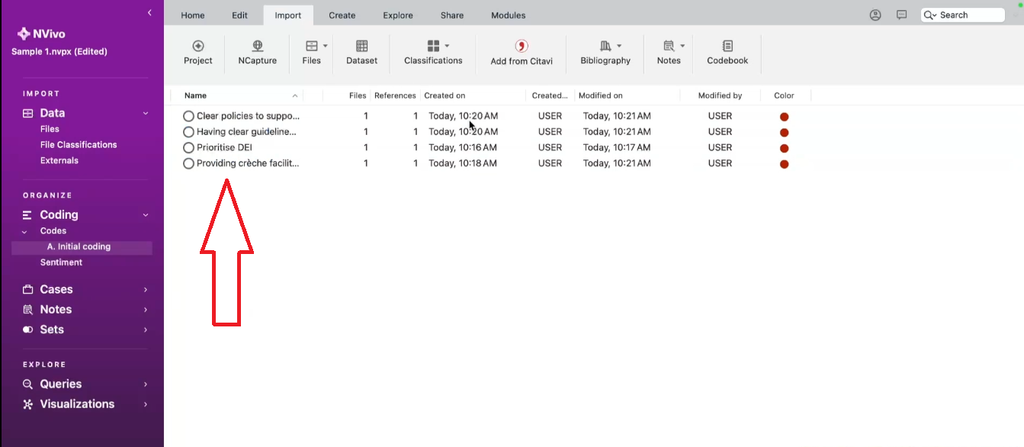
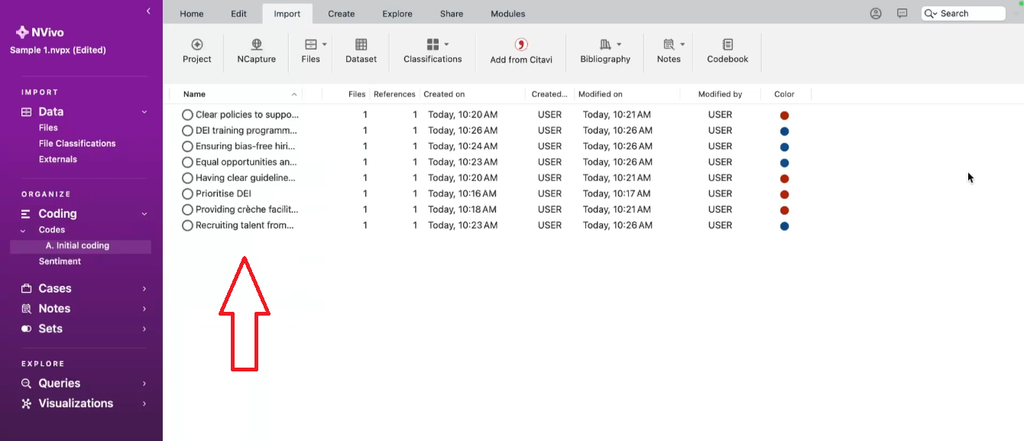
When you Command + A to select all codes from a section and then drag them into a folder, the colors let you immediately see which question each code belongs to.
Step 3 – Use In Vivo Coding
In vivo coding is a special type of code where the participant’s exact words become the code label. It’s useful when a phrase is so precise that paraphrasing it would lose meaning.
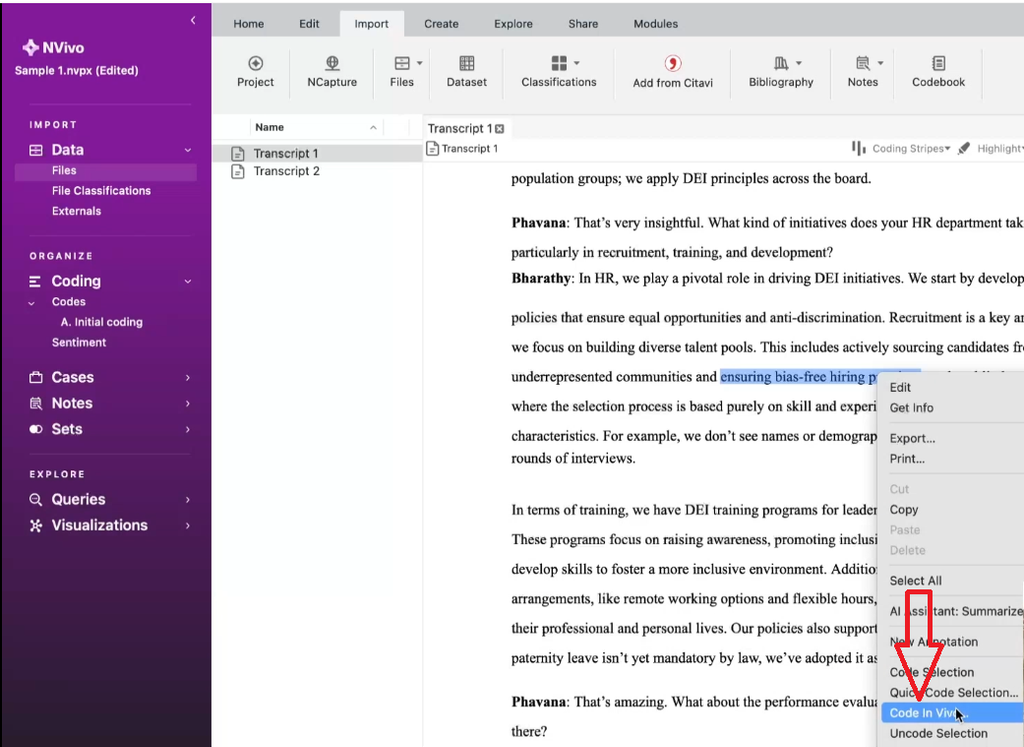
To create an in vivo code: highlight the text, right-click, and select Code Selection → New Code, then type the exact phrase from the transcript. If you double-click on the code later, NVivo shows you the exact quote it came from.
Step 4 – Organize Codes in Folders
Create an “Initial Coding” folder inside your Codes section before you begin. This keeps your workspace clean and makes it easier to review codes later.
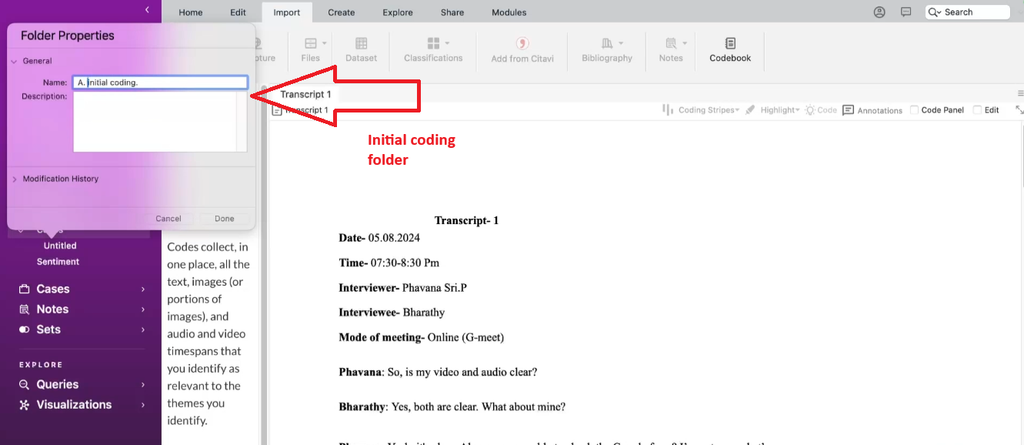
After coding a full question, select all the new codes (Command + A), assign them a color.
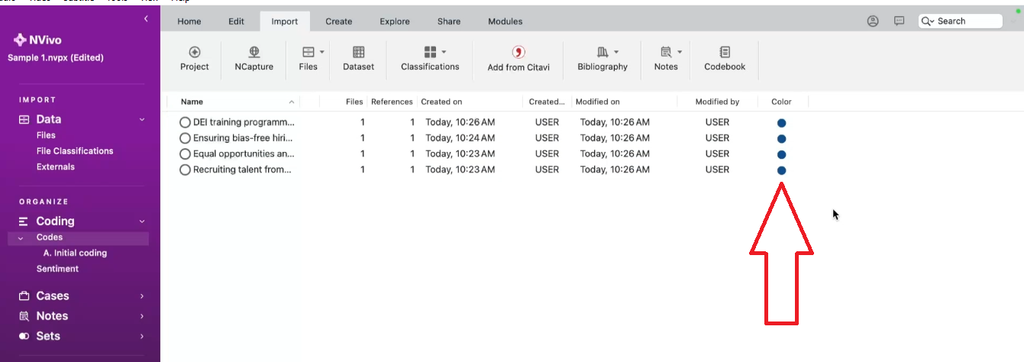
Then drag and drop the entire group into the Initial Coding folder. This structure becomes critical when you move from codes to themes in the next step.
What Comes Next: From Codes to Themes
Once you’ve coded your transcripts, the next step in the Braun and Clarke framework is moving from codes to themes. This involves grouping related codes, reviewing whether the groupings make sense, and then naming your themes clearly.
I cover this in Part 2, including how to export your codebook, build a code list, and produce visuals in NVivo for Mac. You’ll also find the full process in my tutorial on inductive thematic analysis in NVivo.
Frequently Asked Questions
Is NVivo for Mac the same as NVivo for Windows?
The core logic is the same — you import files, create codes, and develop themes. But the interface differs significantly. Menus are in different locations, and behaviors like code placement after creation work differently on Mac. Always use Mac-specific tutorials.
What version of NVivo should I use on Mac?
NVivo 15 for Mac is the current version available through Lumivero’s website. Download it directly from there rather than third-party sites.
Do I need to use thematic analysis with NVivo?
No — NVivo supports multiple coding approaches including grounded theory, framework analysis, and content analysis. But thematic analysis, particularly the Braun and Clarke six-step approach, is the most commonly used method among PhD students analyzing interview data.
How many transcripts can I import into NVivo for Mac?
NVivo for Mac handles multiple transcripts in a single project. For most dissertation studies with 8–20 participants, performance is smooth. Simply select all your transcript files during the import step.
Key Takeaways
- NVivo for Mac and Windows share the same logic but have a different interface — use Mac-specific tutorials
- Download NVivo 15 for Mac directly from Lumivero’s website
- For thematic analysis, you only need two sections in NVivo: Files and Codes
- On Mac, new codes drop into the main Codes folder — drag them into subfolders manually
- Use color coding to track which codes came from which interview question
- The Braun and Clarke six-step framework is the most widely used approach for thematic analysis with interview data
Need Help With Your Analysis?
If you’re feeling stuck or overwhelmed by your qualitative data analysis, I offer two services specifically for PhD students and researchers:
The Done-For-You service handles everything — manual coding, theme development, data visualization, and a full findings report ready for your dissertation’s Chapter 4. I also record a walkthrough video explaining every decision I made in your data.
The One-on-One Consulting service is a live video session (via Zoom or Teams) where I guide you step by step through your own analysis in NVivo. Most researchers move from stuck to confident in a single session.
I carry a five-star average rating across both services. Reach out today — contact details are in the description below.