

Last Updated on 3 weeks ago by Bernard Mugo
Moving from codes to themes in ATLAS.ti means grouping the codes you created during initial coding into broader patterns of shared meaning. It’s the third of Braun and Clarke’s six steps of thematic analysis, and it’s the step where your data starts turning into actual findings. In this guide, I’ll walk you through exactly how I do it in ATLAS.ti, using a real coded transcript as the example.
- What "Moving from Codes to Themes" Means in Thematic Analysis
- Where This Fits in Braun and Clarke's Six Steps
- Step 1: Start With Your Coded Transcript
- Step 2: Group Codes by Color and Shared Meaning
- Step 3: Select Codes and Create a New Group
- Step 4: Rename the Code Group as a Theme
- Step 5: Add a Memo to Define Each Theme
- Step 6: Repeat the Process for Additional Themes
- Step 7: Visualize Your Themes With Network Views
- Reviewing and Exporting Themes With the Code Group Manager
- Common Mistakes When Moving from Codes to Themes
- Frequently Asked Questions
- Key Takeaways
- Need Help With Your Thematic Analysis?
What “Moving from Codes to Themes” Means in Thematic Analysis
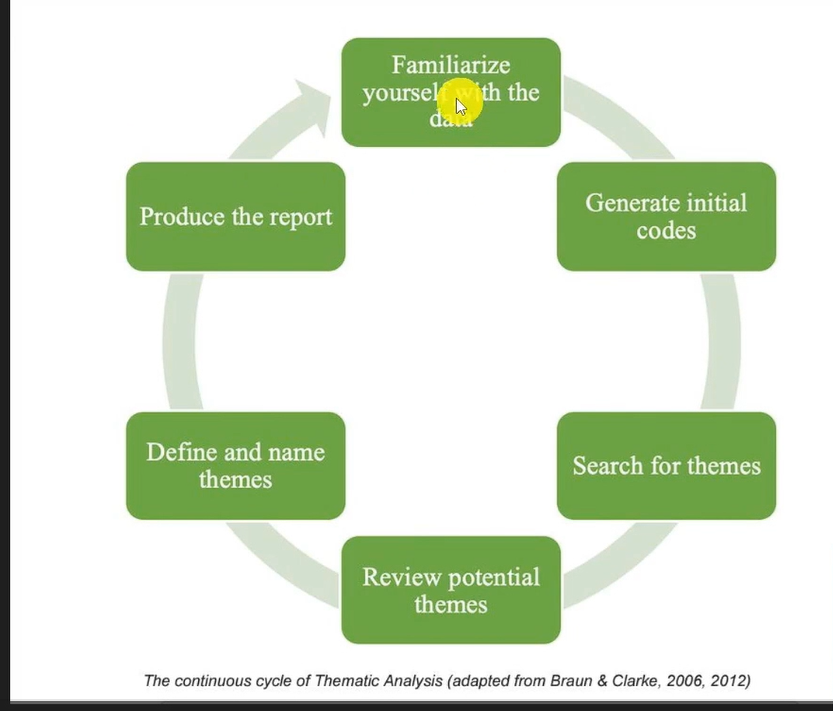
If you’ve already coded your transcripts, you’ve done the hard part of tagging meaningful segments of text. Themes are the next level up: they’re the broader patterns that emerge when you group codes that share an underlying meaning. This is exactly the process described in Braun and Clarke’s original 2006 thematic analysis paper, which lays out six steps: familiarizing yourself with the data, generating initial codes, generating themes, reviewing and refining themes, defining and naming themes, and finally writing the report.
If you’re still working on your initial coding, it’s worth going back to that stage first, because the quality of your themes depends entirely on how well your codes were built in the first place.
Where This Fits in Braun and Clarke’s Six Steps
Moving from codes to themes sits right in the middle of the process. You need solid codes from step two before you can do this well, and the themes you build here will go through further review and refinement in step four. Think of this stage as sorting: you’re not creating new meaning out of nothing, you’re organizing the meaning you already captured while coding.
Step 1: Start With Your Coded Transcript
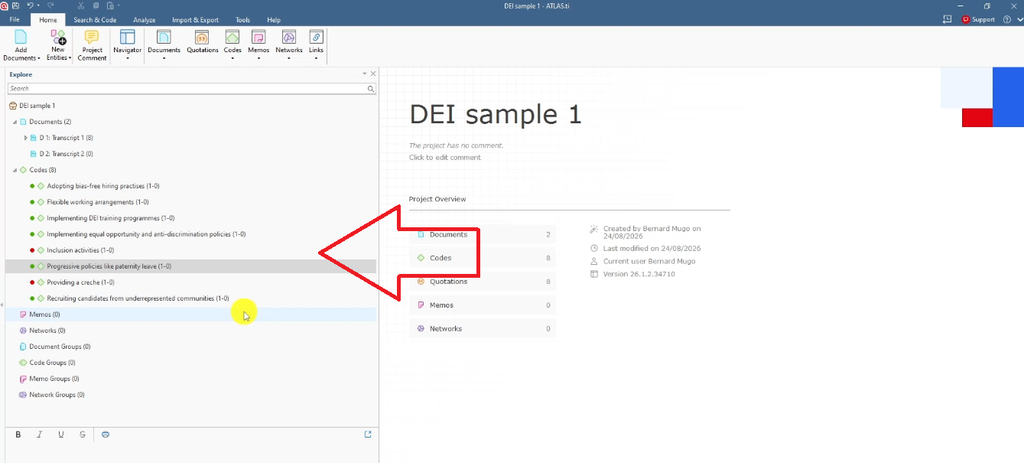
Open the transcript you already coded in ATLAS.ti (if you haven’t coded a transcript yet, see my earlier post on inductive thematic analysis in ATLAS.ti using the Saldana method) and scroll down to your list of codes. In the example I use throughout this guide, the interview was about diversity, equity, and inclusion (DEI) in organizations, and the codes included things like providing a creche, inclusion activities, implementing equal opportunity and anti-discrimination, recruiting candidates from underrepresented communities, implementing DEI training programs, flexible working arrangements, and progressive policies like paternity leave.
Step 2: Group Codes by Color and Shared Meaning
Before you group anything, look at how your codes are color-coded. I mark codes in different colors depending on which interview question they came from — for example, codes from a question about DEI initiatives in general might be red, while codes from a question about HR-specific initiatives might be green. This isn’t just for decoration. It gives you a quick visual map of where each code originated, which matters when you’re deciding whether two codes actually belong to the same theme or just happen to sound similar.
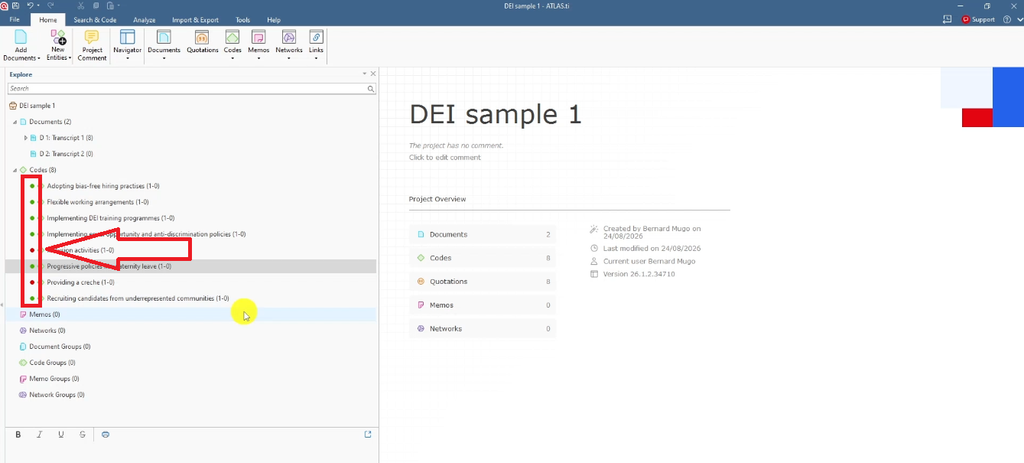
For a PhD student coding twenty or thirty interviews, this color system is what keeps you from accidentally merging codes that came from completely different parts of the interview guide.
Step 3: Select Codes and Create a New Group
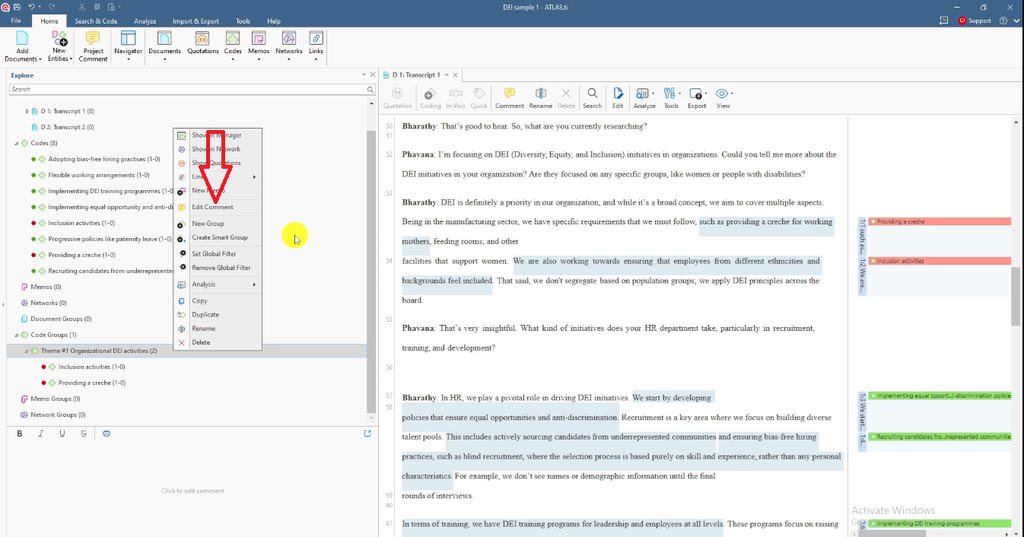
Once you spot codes that share meaning, select them together. In my example, the codes “providing a creche” and “inclusion activities” both came from a question about DEI initiatives, and read together, they point to the same underlying idea: the organization creating supportive conditions for employees. So I selected both, right-clicked, and chose “New Group from Selection.”
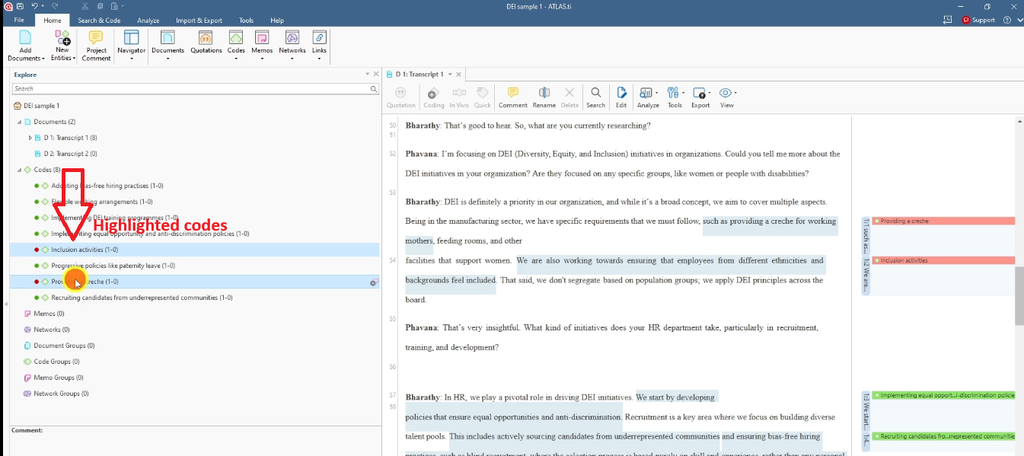
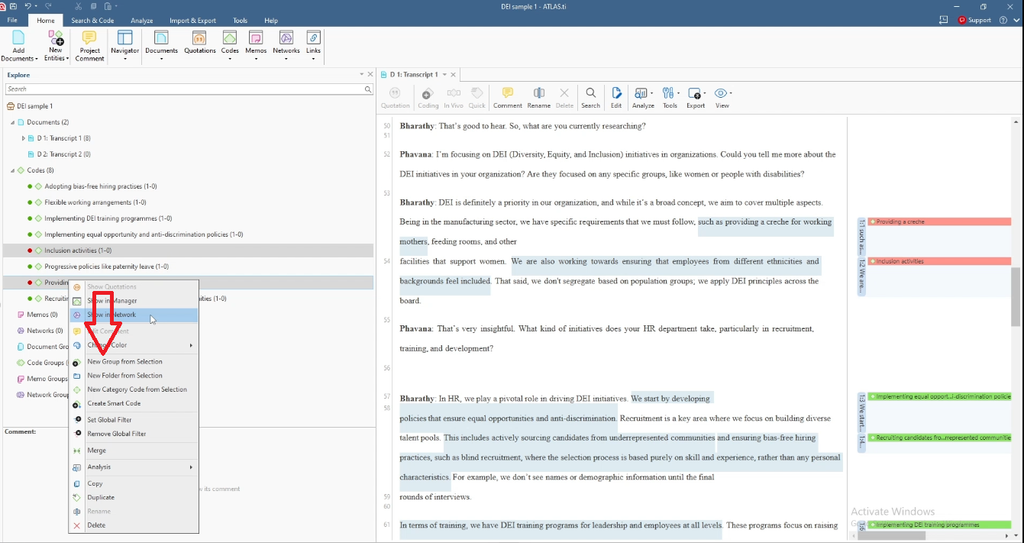
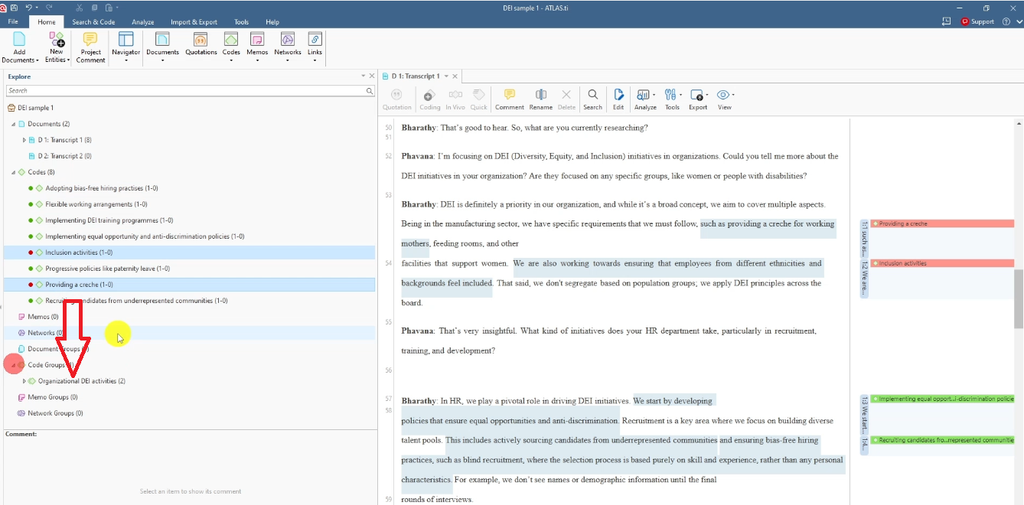
This is a core ATLAS.ti feature for theme-building. It takes the codes you’ve selected and turns them into a code group in one step, rather than making you build the group manually and add codes to it one at a time.
Step 4: Rename the Code Group as a Theme
ATLAS.ti will label what you just created as a code group, but at this point it’s functioning as a theme, so I rename it accordingly. Right-click the group, choose Rename, and give it a clear, descriptive name. In this example, I named it “Organizational DEI Activities” and used a hashtag naming convention so it’s easy to spot in a long list of groups.
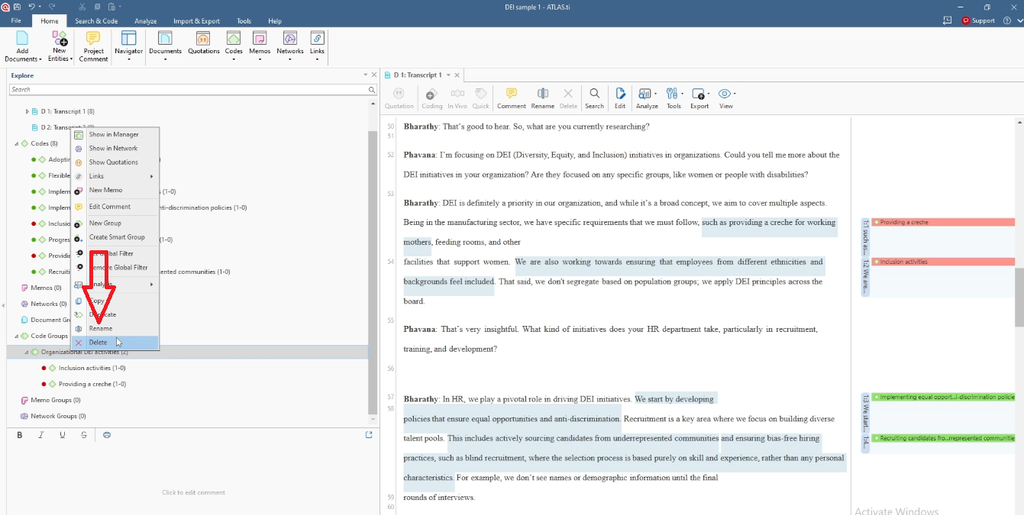
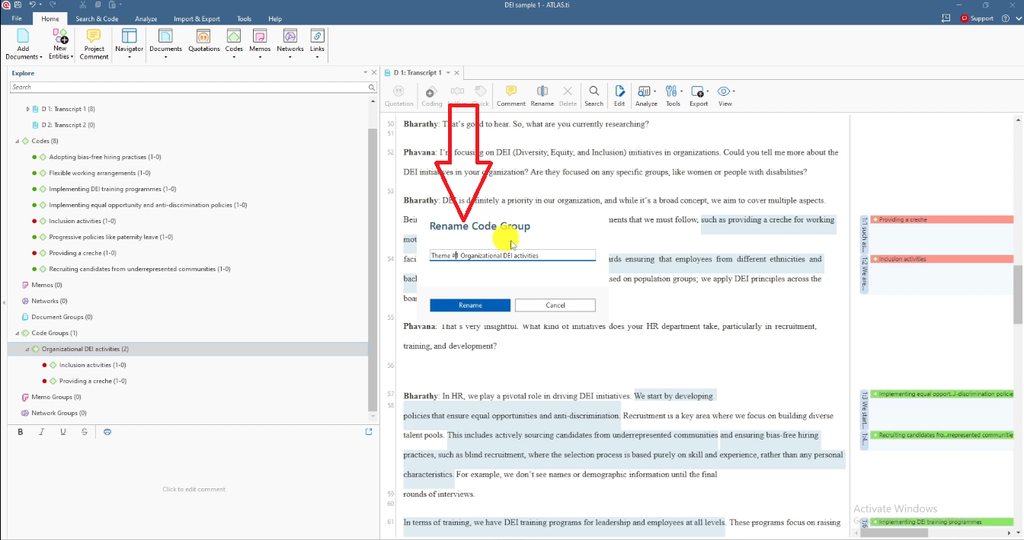
Step 5: Add a Memo to Define Each Theme
A theme without a definition is just a label. Right-click the group again, go to edit Comment, and write a short description of what the theme actually represents. For “Organizational DEI Activities,” I wrote: “This theme represents the different diversity, equity, and inclusion activities implemented by the organization.”
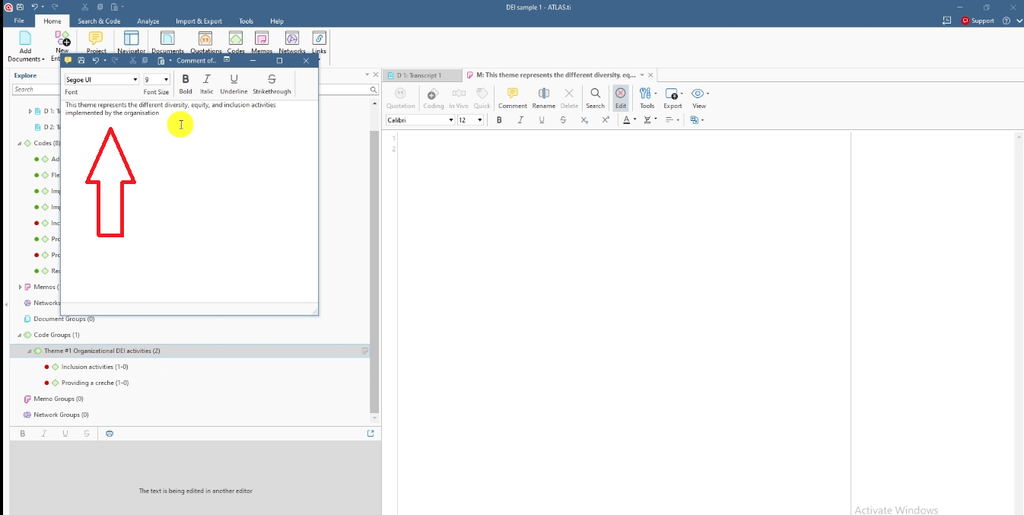
This step matters more than it looks. When you get to writing up your findings, these memo descriptions become the backbone of your results section — you’re essentially defining and naming your themes as you go, rather than trying to reconstruct what you meant weeks later.
Step 6: Repeat the Process for Additional Themes
You’ll do this same sequence for every theme in your dataset. Continuing the example, I went back to the codes generated from a different interview question — this time about what the HR department does around recruitment, training, and development. The relevant codes were adopting bias-free hiring practices, flexible working arrangements, DEI training programs, equal opportunity and anti-discrimination, progressive policies like maternity leave, and recruiting candidates from underrepresented communities.
I selected all of them, created a new group, and named it “HR Related DEI Initiatives” rather than something generic like just “Organization.” The memo for this one reads: “This theme represents all the initiatives taken by human resource departments across organizations to implement diversity, equity, and inclusion.”
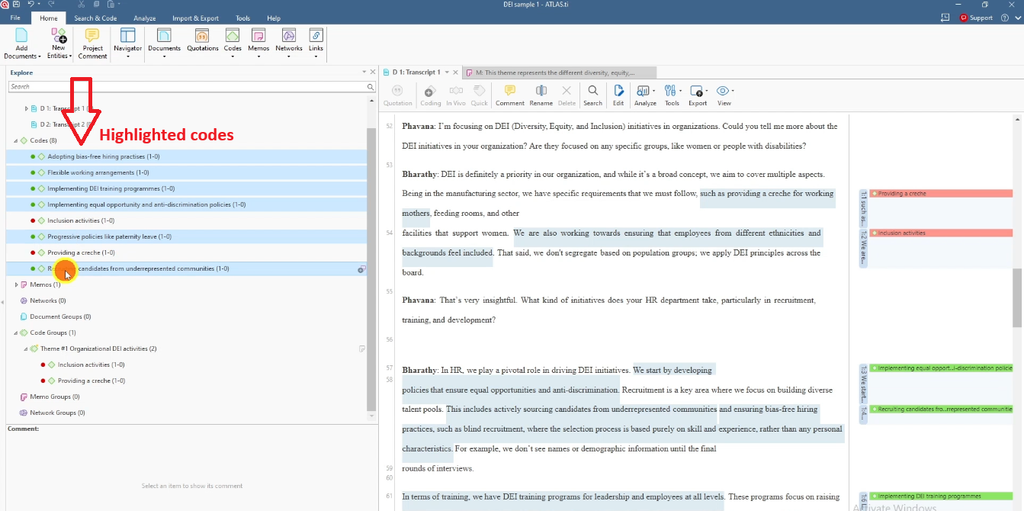
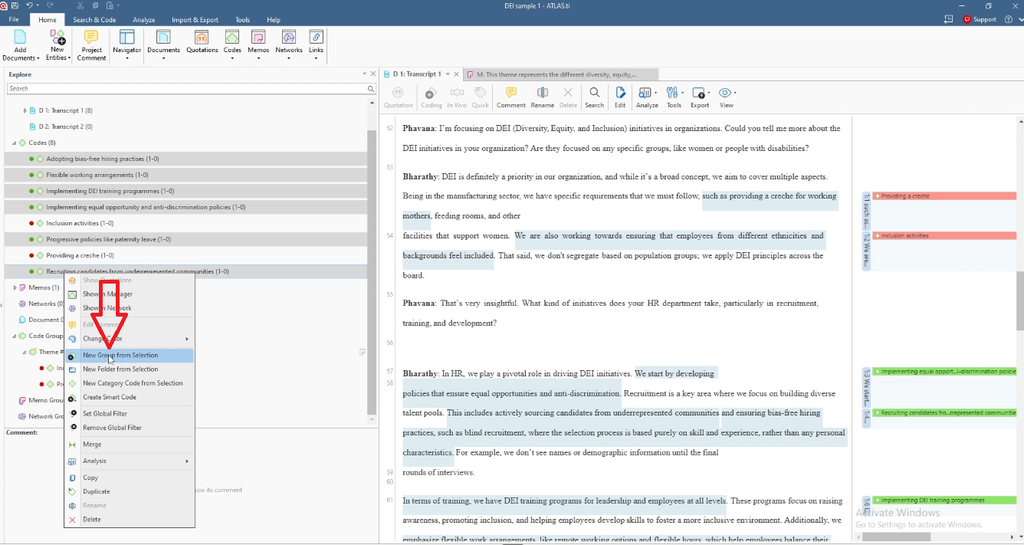
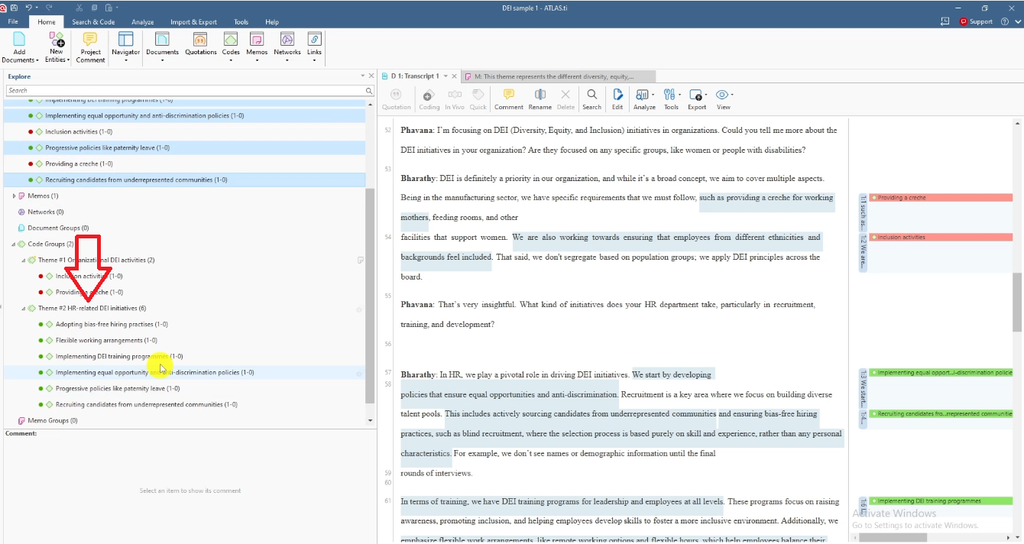
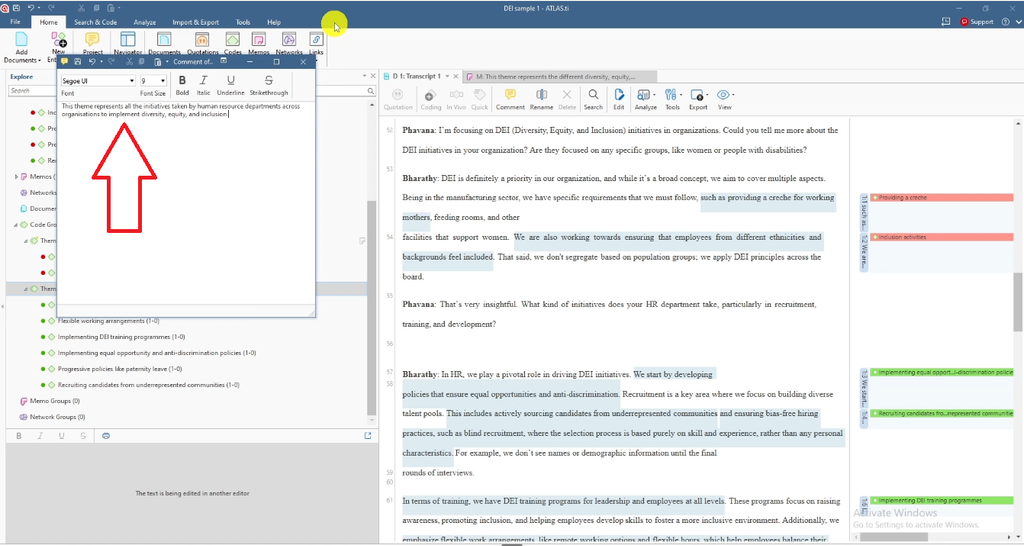
Notice that codes don’t need to share the exact same color to belong in the same theme — what matters is whether they share meaning. Color-coding tells you where a code came from; shared meaning is what tells you where it belongs.
Step 7: Visualize Your Themes With Network Views
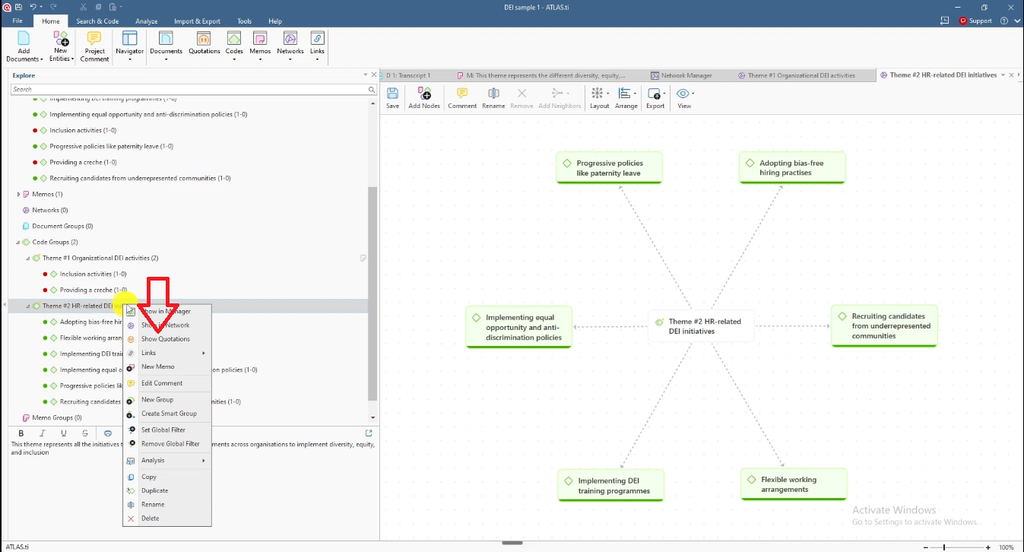
Once you have a few themes built, right-click a theme and select Show in Networks, then drag it onto the network canvas. ATLAS.ti will pull in the codes that make up that theme automatically. You can switch the layout to circular or bottom-up to see the relationships more clearly.
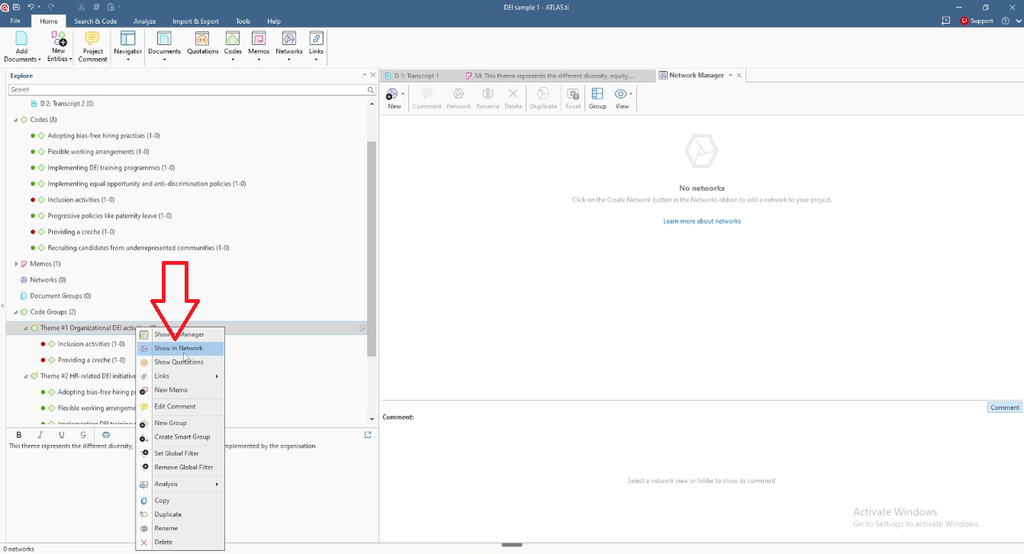
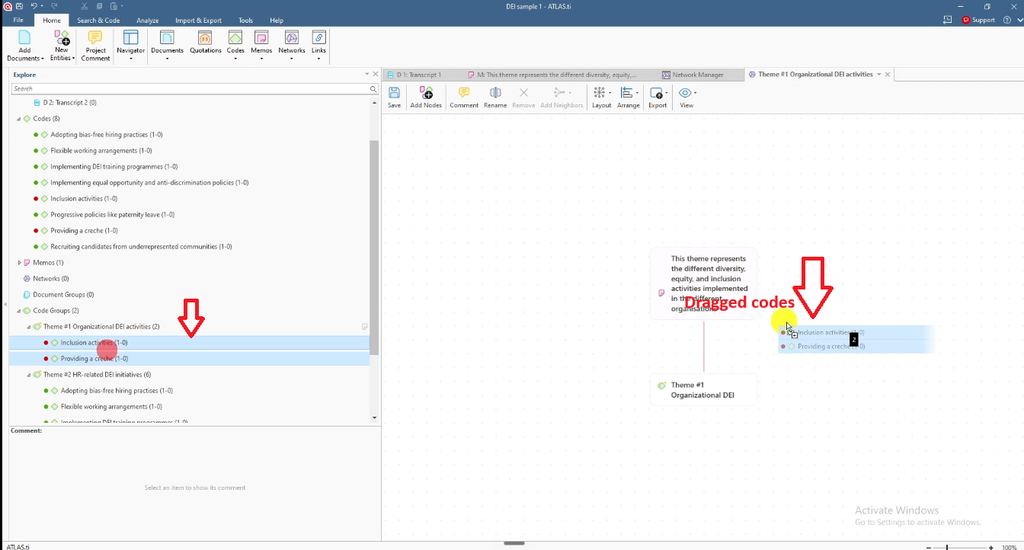
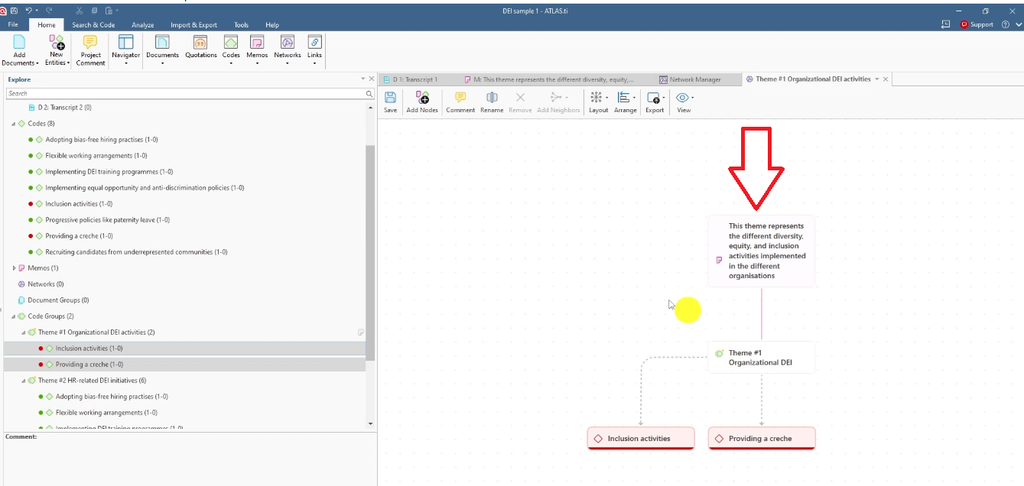
This visual step is genuinely useful for a dissertation defense or a supervisor meeting — it’s a fast way to show an examiner exactly how a theme was built from the ground up, rather than just asserting that the theme exists.
Reviewing and Exporting Themes With the Code Group Manager
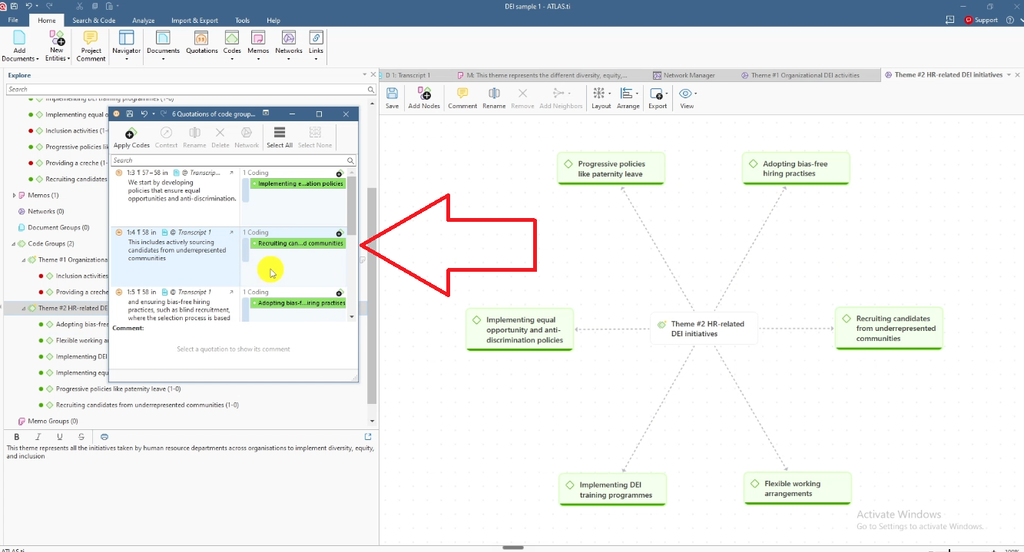
ATLAS.ti’s Code Group Manager works like a code manager but at the theme level. Right-click a group and choose Show Quotation to see every code that feeds into a theme, alongside the codes that haven’t been assigned anywhere yet. From here, you can export the whole structure, which is useful when you want to share your coding framework with a supervisor or include it as an appendix in your thesis.
Common Mistakes When Moving from Codes to Themes
- Combining codes just because they sound similar, without checking whether they actually came from the same underlying idea
- Skipping the memo step and trying to remember weeks later why a theme was named the way it was
- Forcing every code into a theme, even when a code doesn’t really fit anywhere yet
- Never revisiting themes after the first pass — reviewing and refining is its own step in Braun and Clarke’s framework, not optional
- Ignoring the network visualization, which is often where a mismatched code becomes obvious
Frequently Asked Questions
What’s the difference between a code and a theme in ATLAS.ti? A code tags a specific, meaningful segment of text. A theme is a broader pattern built by grouping codes that share an underlying meaning — in ATLAS.ti, this is done using code groups.
How many codes should make up a theme? There’s no fixed number. What matters is that every code in the group shares genuine conceptual meaning with the others, not that the group hits a specific size.
Can I use “New Group from Selection” for anything other than themes? Yes — ATLAS.ti’s code groups are a general organizing tool. For thematic analysis specifically, you’re using them to represent themes, but the same feature can group codes for other purposes too.
Do I need to write a memo for every theme? I’d strongly recommend it. A short memo describing what each theme represents saves significant time later when you’re writing your findings chapter, and it’s much easier to write while the coding decisions are fresh.
Key Takeaways
- Moving from codes to themes is step three of Braun and Clarke’s six-step thematic analysis framework
- Use ATLAS.ti’s color-coding to track where each code came from before deciding whether codes belong together
- Select related codes and use “New Group from Selection” to build a theme in one step
- Rename the group and add a memo describing what the theme represents while the reasoning is still fresh
- Use network views and the Code Group Manager to sanity-check and export your themes
Need Help With Your Thematic Analysis?
If you’re feeling stuck on your data analysis chapter, you don’t have to figure it out alone. I offer a done-for-you qualitative data analysis service using ATLAS.ti that covers coding, theme development, and visualization from start to finish. If you’d rather learn to do the analysis yourself, I also offer one-on-one ATLAS.ti consulting, where I guide you step by step through mastering the software and running your own qualitative data analysis. Reach out through Surviving Research to get started.
![Qualitative Analysis of Interviews in ATLAS.ti [Step-by-Step]](https://survivingresearch.com/wp-content/uploads/2025/09/Qualitative-Data-Analysis-Just-Got-Easier-Atlas.ti-Tutorial-2025.jpg)
![Thematic Analysis in ATLAS.ti: Braun and Clarke 6 Steps [Full Guide]](https://survivingresearch.com/wp-content/uploads/2025/10/Thematic-Analysis-with-Atlas-ti.jpg)