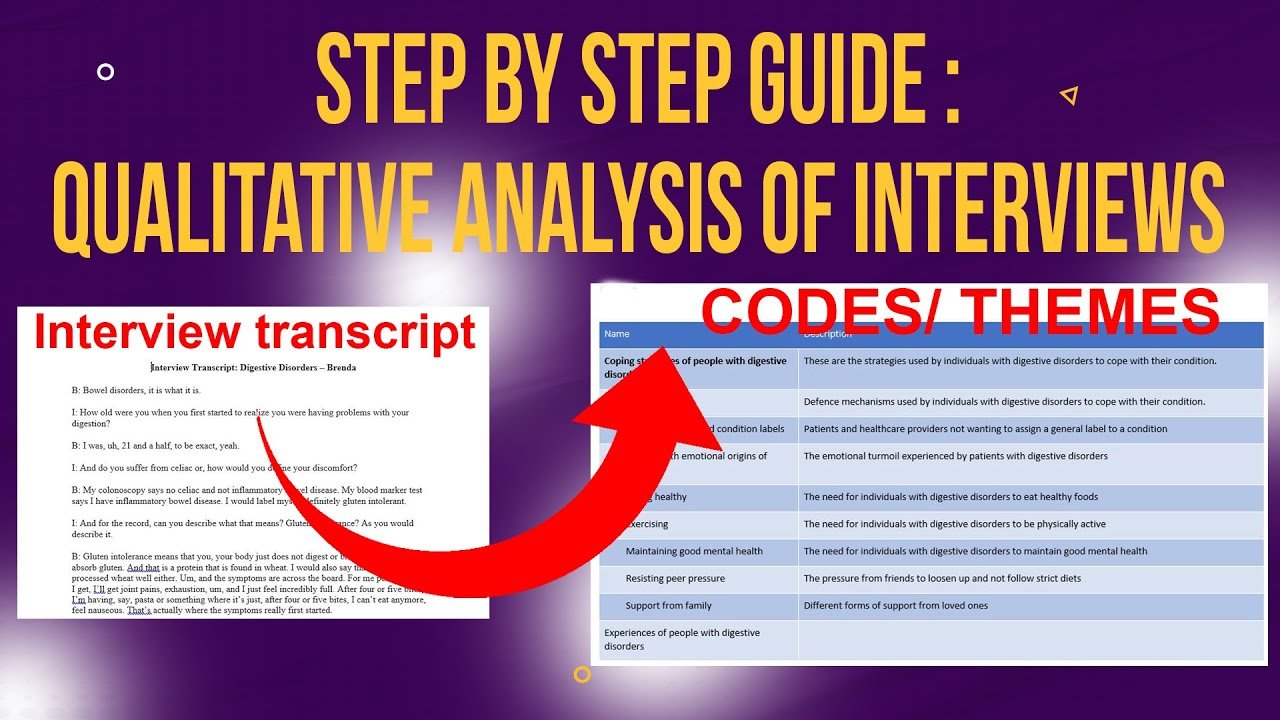

You downloaded NVivo, watched the tutorials, and still haven’t coded a single thing — and your deadline keeps getting closer. I’ve helped nearly 400 PhD students get past this exact block over the last three and a half years, and the problem is never the software. It’s that nobody hands you a safe NVivo practice dataset to experiment on first. In this guide, I’ll show you exactly how to go from a blank NVivo project to your first real set of codes, using a free practice dataset and Braun and Clarke’s six-step method for thematic analysis.
- Why You Need a Practice Dataset Before Touching Your Real Data
- Where to Find a Free NVivo Practice Dataset (Figshare)
- How to Set Up Your NVivo Project the Right Way
- How to Import Transcripts Into NVivo
- Braun and Clarke's Six Steps of Thematic Analysis
- Step 1: Familiarize Yourself With the Data Before Coding
- What Is a Code? A Quick Example From Saldaña's Coding Manual
- Step 2: How to Practice Coding Inside NVivo
- How to Manage Codes Across Multiple Participants
- Frequently Asked Questions
- Key Takeaways
- What's Next: From Codes to Themes (Part 2)
What is a practice dataset? A practice dataset is a set of real (but low-stakes) interview transcripts and study materials you can code and experiment on before you touch your actual research. It lets you make mistakes, try different coding approaches, and learn NVivo without any risk to your dissertation or thesis.
By the end of this guide, you’ll have set up your NVivo project properly, imported transcripts, understood Braun and Clarke’s six steps of thematic analysis, and completed your first real coding session — not just watched someone else do it.
Why You Need a Practice Dataset Before Touching Your Real Data
Most people assume the way to learn NVivo is to watch tutorial after tutorial until they feel “ready.” That’s backwards. You don’t learn NVivo by watching — you learn it by doing.
The real reason most beginners never start is that they’re terrified of messing up their real data. So use a separate, disposable dataset first. I’ve put together a complete free practice dataset — real interview transcripts, a study description, and everything else you need — so you can download it here and follow along with every step below.
Where to Find a Free NVivo Practice Dataset (Figshare)
If you’d rather build your own practice dataset instead of using mine, here’s exactly how I find mine:
- Figshare, a repository where researchers share dissertations, theses, and other research materials — including interview transcripts — once their studies are complete.
- Search “transcripts” (or a topic you’re interested in) in the search bar.
- Open a few results and skim them for clear, complete interview responses.
- Click Download on the ones you want to use.
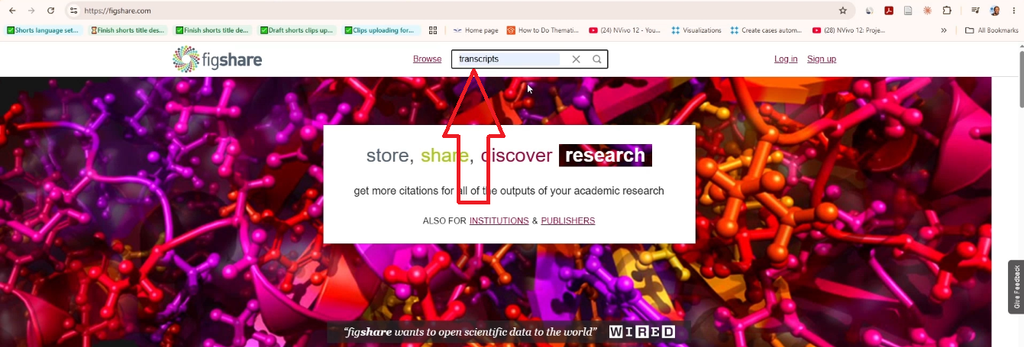
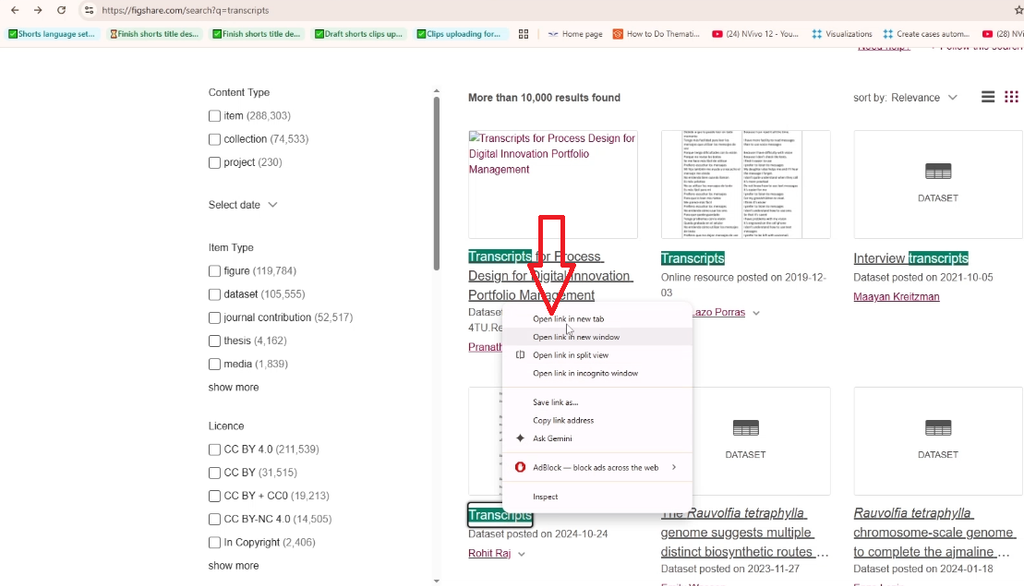
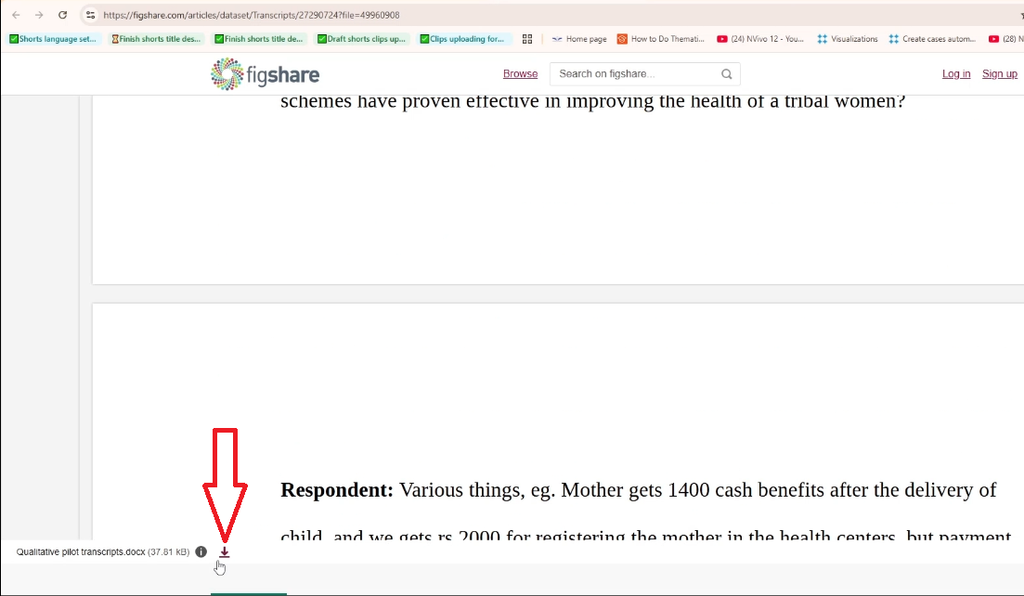
This is where I get the transcripts I use in my own videos, and it’s a safe source of realistic data that isn’t tied to your own research.
How to Set Up Your NVivo Project the Right Way
I’m using NVivo 15, the current version from Lumivero, but these steps apply to any recent version.
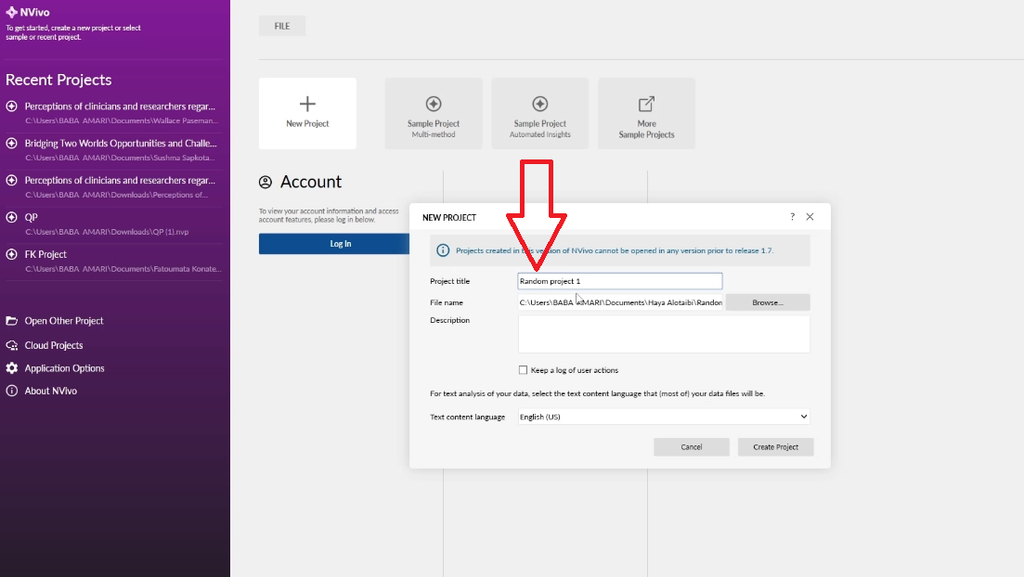
- Open NVivo and click the plus (+) icon to start a new project.
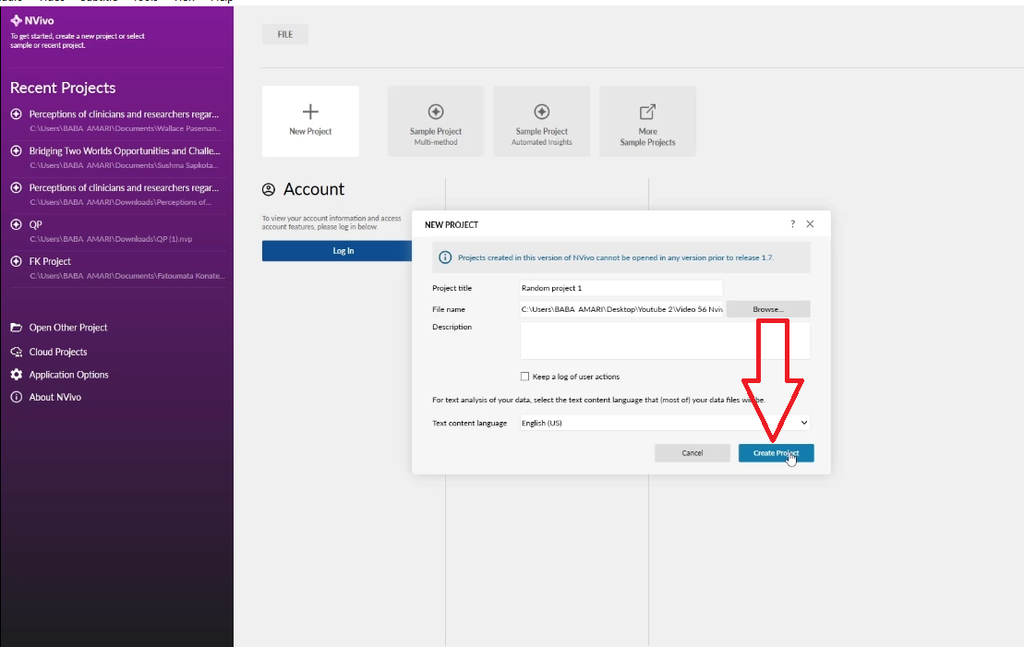
- Name the project anything you like — I called mine “Random Projects,” since it’s just for practice.
- Browse to a folder on your local hard drive and save it there.
- Click Create Project.
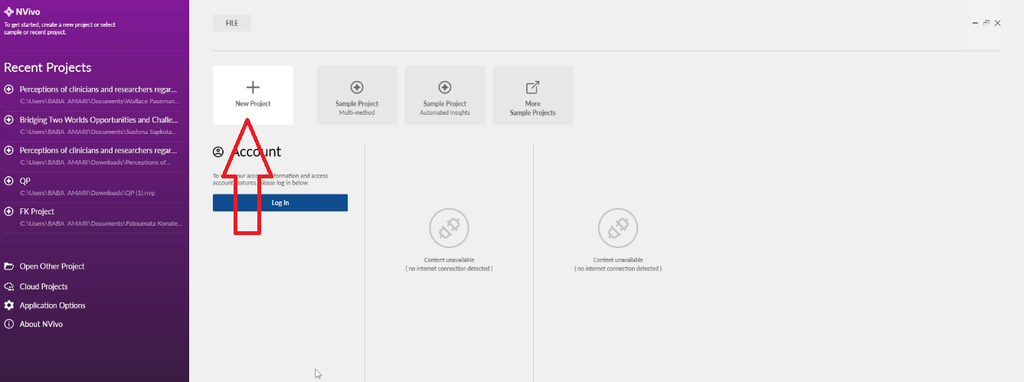
Never Save Your Project to Google Drive or OneDrive
Don’t save your NVivo project inside a cloud-synced folder like Google Drive or OneDrive. Once NVivo tries to read and write files while they’re syncing to the cloud, you get conflicts — and the project can hang or struggle to retrieve information properly. Always save locally.
Understanding the Files and Codes Sections
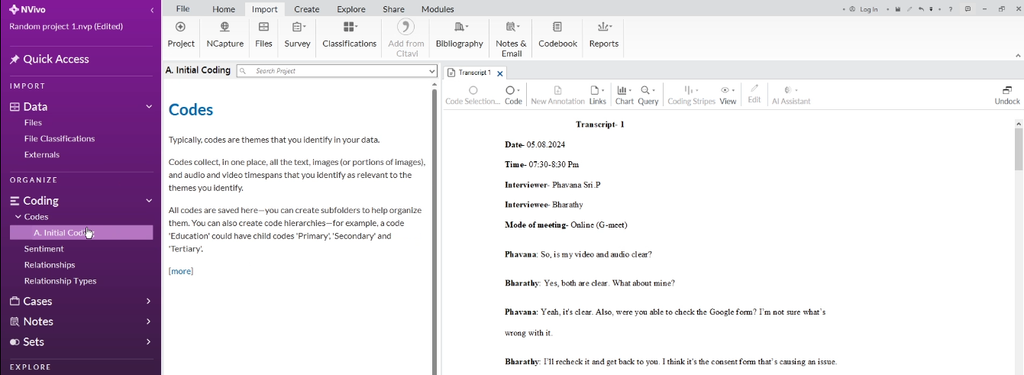
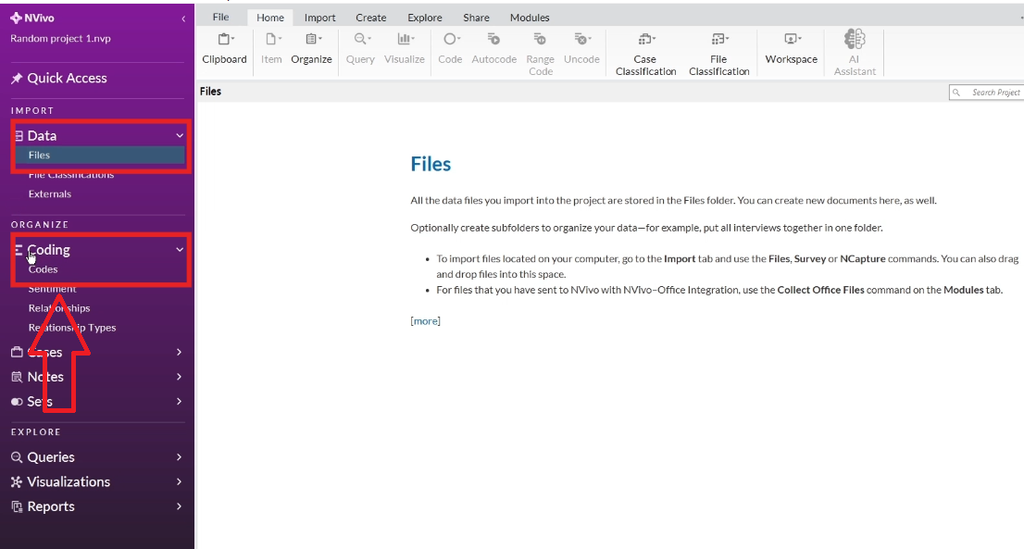
NVivo organizes your work into two areas you’ll live in as a beginner: the Data section, where your Files live, and the Coding section, where your Codes live. You import raw material into Files, then build your Codes from that material. For a deeper look at the rest of the interface, see our full guide to mastering qualitative analysis with NVivo.
How to Import Transcripts Into NVivo
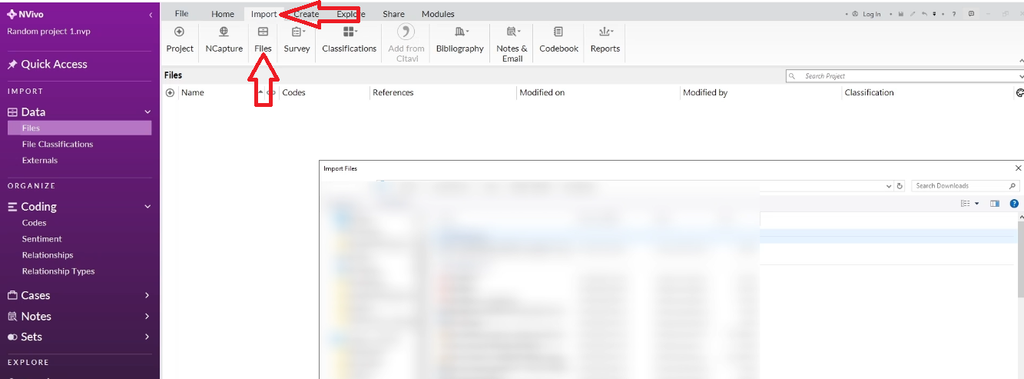
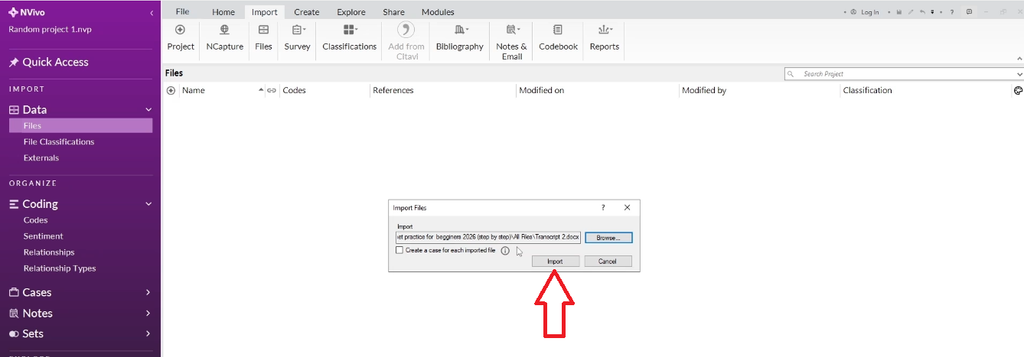
- In the Files section, click Import Files.
- Browse to wherever you saved your downloaded transcripts and select them.
- Click Import.
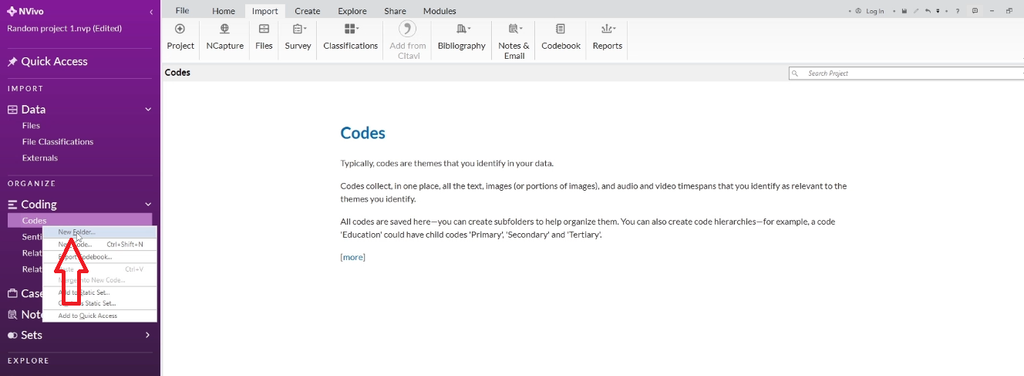
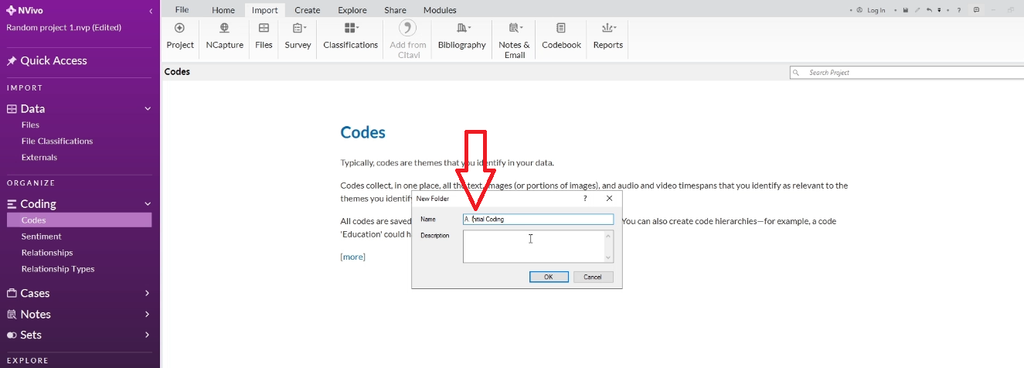
- Right-click inside the Codes section, choose New Folder, and create a folder to hold your first round of codes. I named mine “A – Initial Coding” so it’s easy to find once I add folders for themes later.
Braun and Clarke’s Six Steps of Thematic Analysis
Thematic analysis is a method for identifying patterns — themes — across qualitative data such as interview transcripts. Virginia Braun and Victoria Clarke defined the process in six steps in their widely cited 2006 paper on thematic analysis in psychology:
- Familiarizing yourself with the data
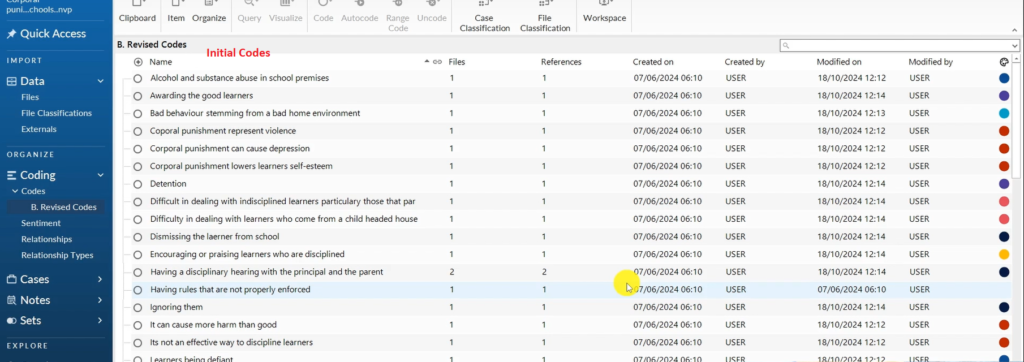
- Generating initial codes
- Developing themes
- Reviewing the themes
- Defining and naming themes
- Producing the report
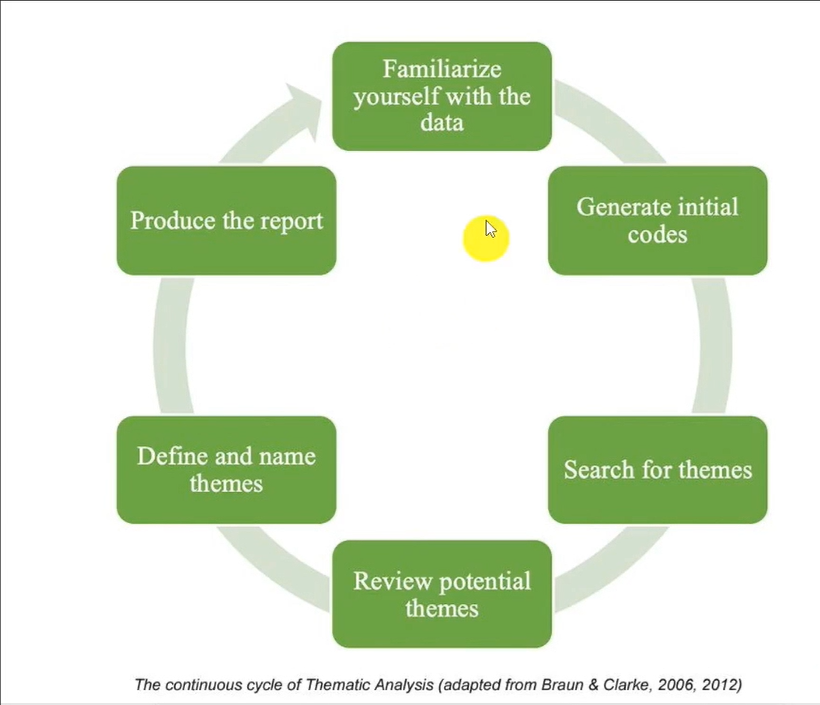
This guide covers the first two steps — familiarization and initial coding. Part 2 covers turning your codes into themes and producing your findings report. If you want a deeper academic breakdown of each phase, Scribbr’s guide to thematic analysis is a solid companion resource.
Step 1: Familiarize Yourself With the Data Before Coding
Familiarizing yourself with the data means knowing what your study is about before you highlight a single word. Skipping this step is the biggest mistake beginners make.
Start by reading the study title, objectives, and research questions. For this walkthrough, I’m using a real study about diversity, equity, and inclusion (DEI) initiatives in the manufacturing sector. Its objective was to examine how DEI initiatives are implemented, and what impact they have, through HR practices.
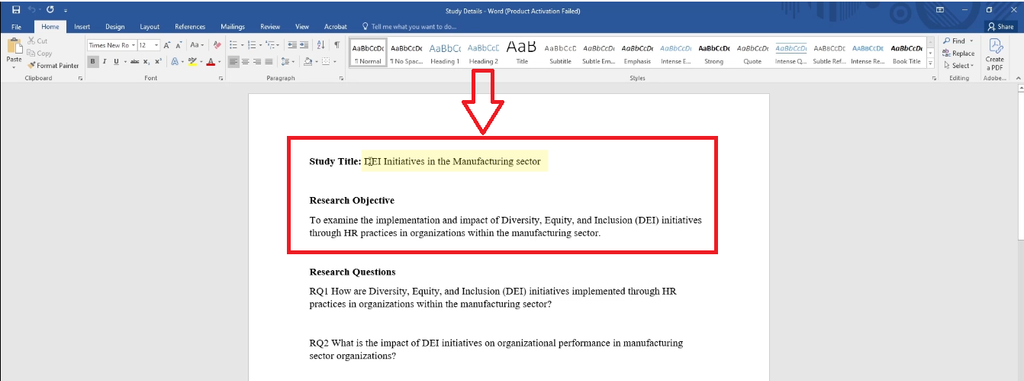
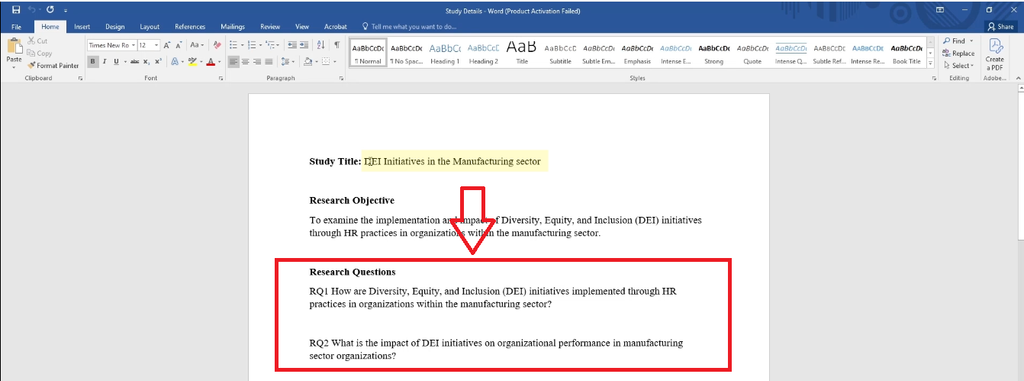
The two research questions were:
- How are DEI initiatives implemented through HR practices in organizations within the manufacturing sector?
- What is the impact of DEI initiatives on organizational performance in manufacturing sector organizations?
Once you know the study’s focus, read through the full transcripts before you code anything. You can double-click a file inside NVivo to open and read it directly in the software.
What Is a Code? A Quick Example From Saldaña’s Coding Manual
A code is a label or interpretive statement attached to any piece of information that’s important to your research questions. You only code the parts of your data that relate to what you’re trying to answer — not everything.

Here’s a short example from Johnny Saldaña’s The Coding Manual for Qualitative Researchers, a text I’d recommend to any beginner:
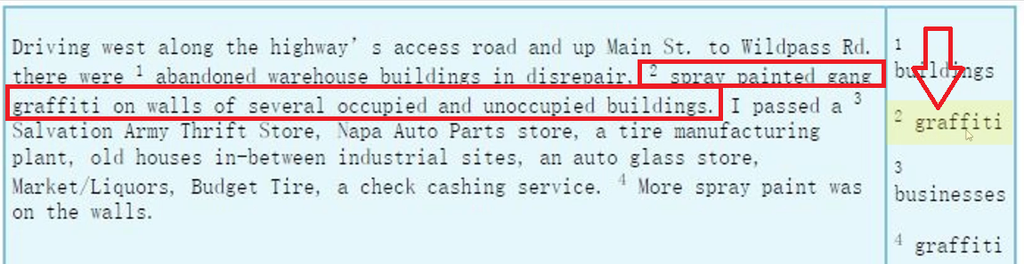
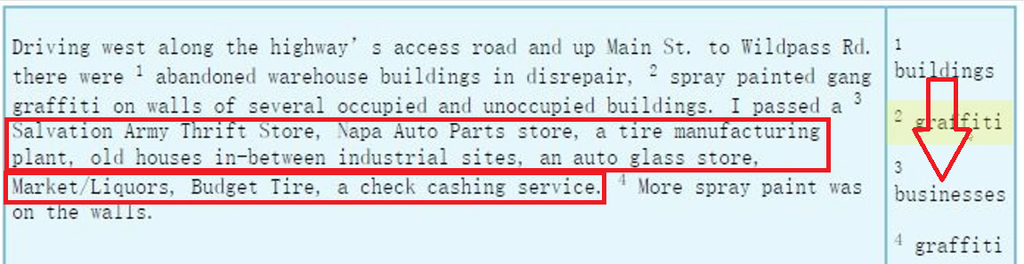
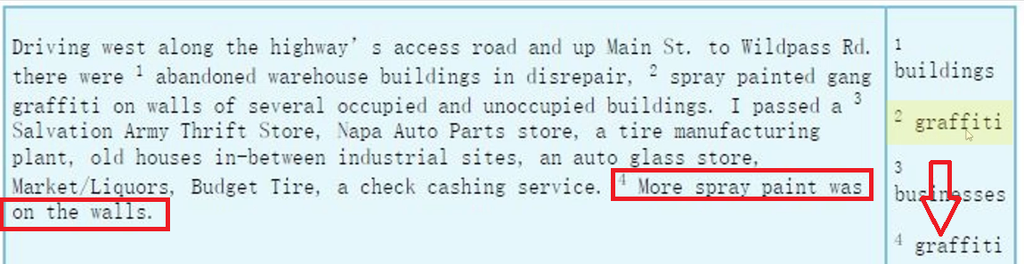
“Driving west along the highway access road up the main street to Wild Pass, there were abandoned warehouse buildings in disrepair, spray-painted gang graffiti on walls of several unoccupied and occupied buildings. I passed a Salvation Army thrift store, NAPA Auto Parts, a tire manufacturing plant, old houses in between industrial sites, an auto glass store, Market Liquors, Budget Tire, a check cashing service, and more spray paint was on the walls.”
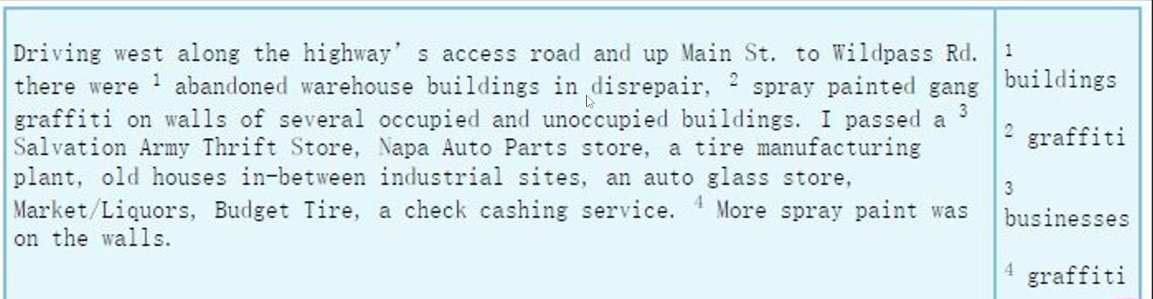
Breaking that paragraph into codes looks like this:
- “Abandoned warehouse buildings in disrepair” → code: buildings
- “Spray-painted gang graffiti on walls” → code: graffiti
- The list of shops and services → code: businesses
- “More spray paint was on the walls” → code: graffiti (again)
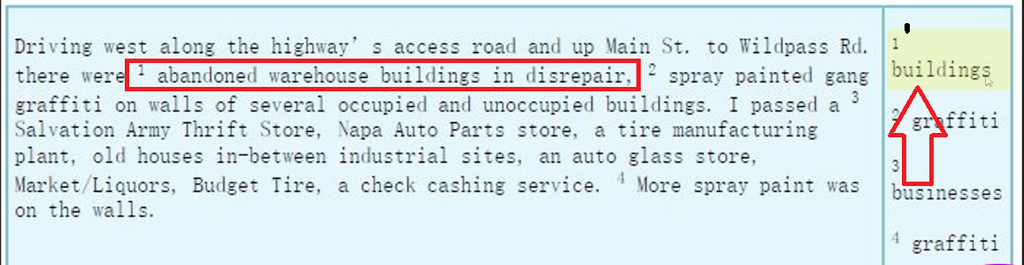
Notice that codes are short, descriptive labels — not full sentences and not judgments. They’re tags you can search, group, and eventually build into themes. If you want a broader primer on coding beyond NVivo specifically, Grad Coach’s guide to qualitative data coding is a good place to start.
Step 2: How to Practice Coding Inside NVivo
Using Interview Questions as Code Containers
Before coding responses, I use each interview question as a “container” to keep my codes organized:
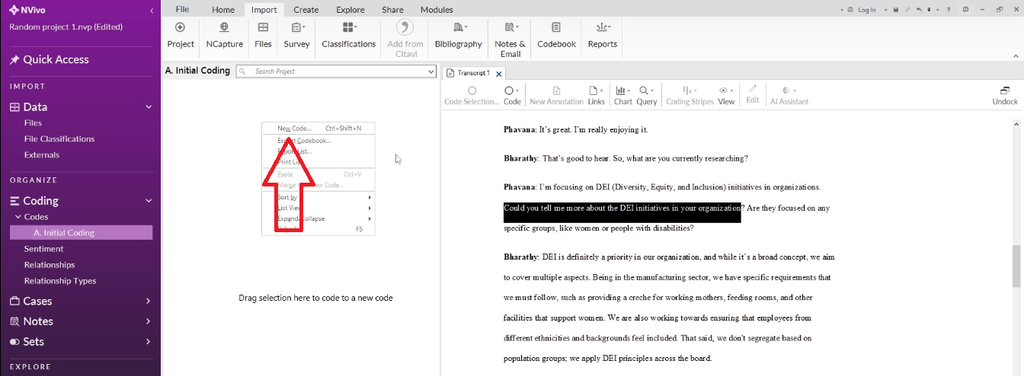
- Highlight the interview question text.
- Right-click and select New Code, then name it after the question (e.g., “Question 1”).
- If prompted, select Aggregate Coding from Children and click OK — this rolls up everything coded under that question.
- For follow-up questions, create a child code under the same container (e.g., “Question 1A”).
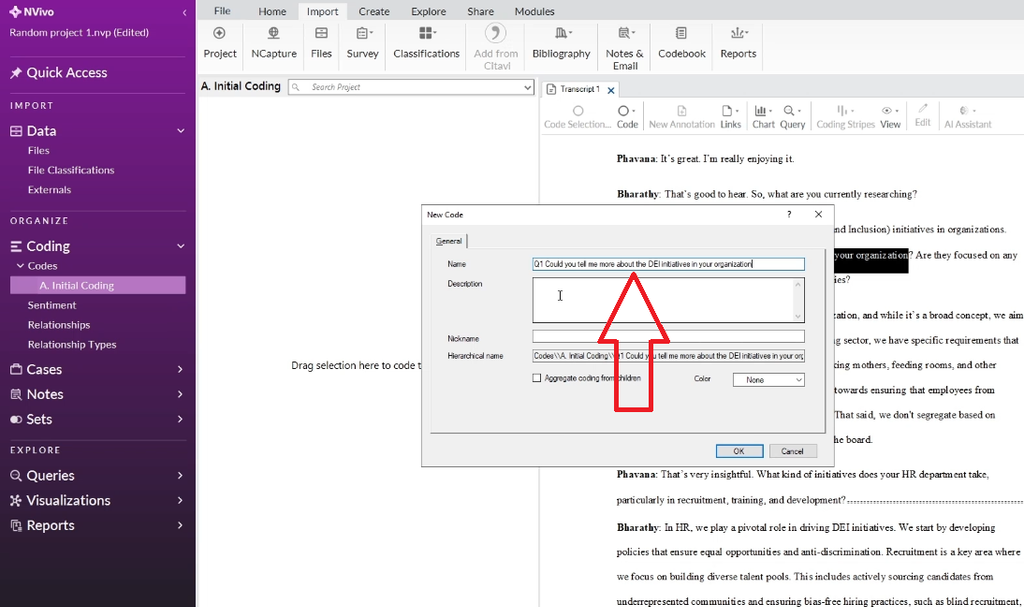
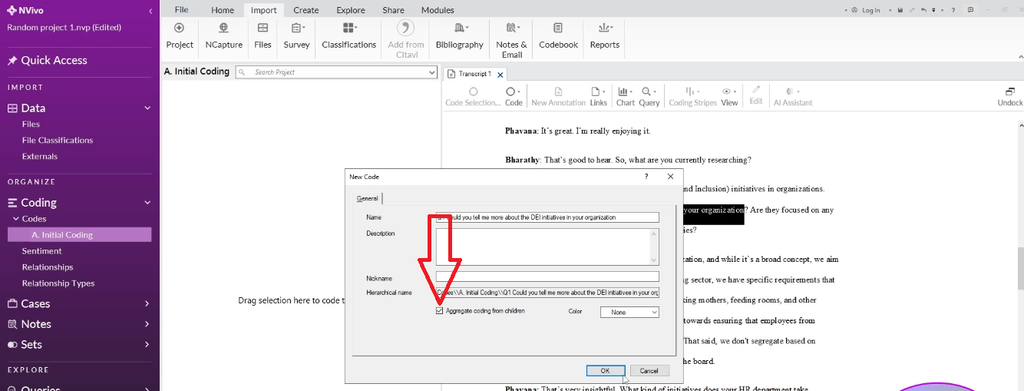
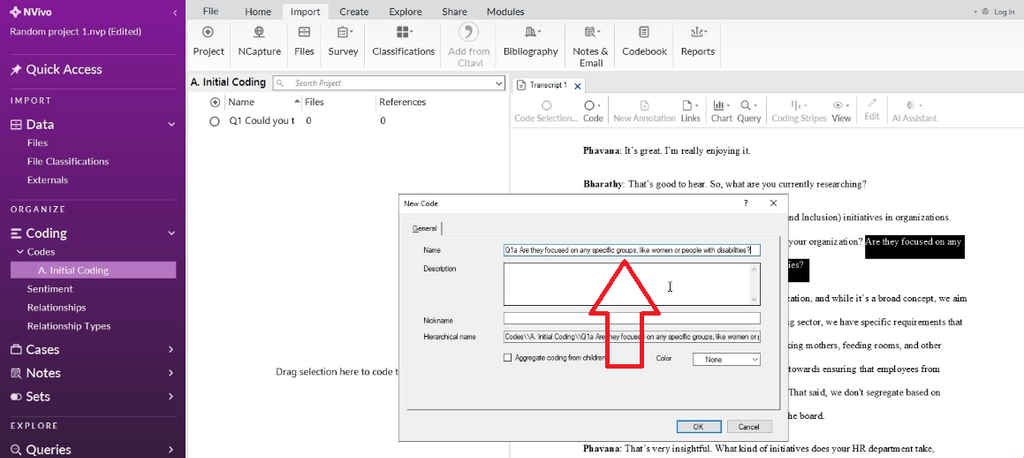
This is purely organizational — it doesn’t change the meaning of your codes. It just stops hundreds of codes from ending up scattered everywhere, which makes turning codes into themes far easier later. For more coding techniques like this, see our guide to qualitative coding of interviews with NVivo. If you’d rather build your codebook around Saldaña’s approach instead of question containers, our guide to inductive thematic analysis using NVivo (Saldaña’s method) walks through that alternative.
Coding Your First Participant’s Response
Take the first interview question: “Could you tell me more about DEI initiatives in your organization? Are they focused on any specific groups like women or people with disabilities?” Here’s how I coded the response:
- Read the full response before coding anything.
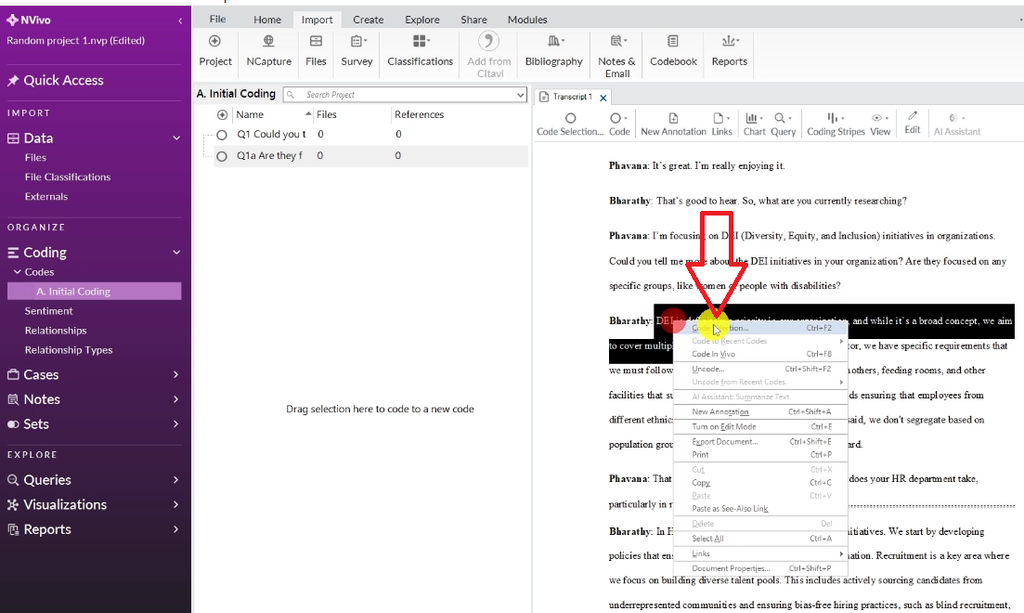
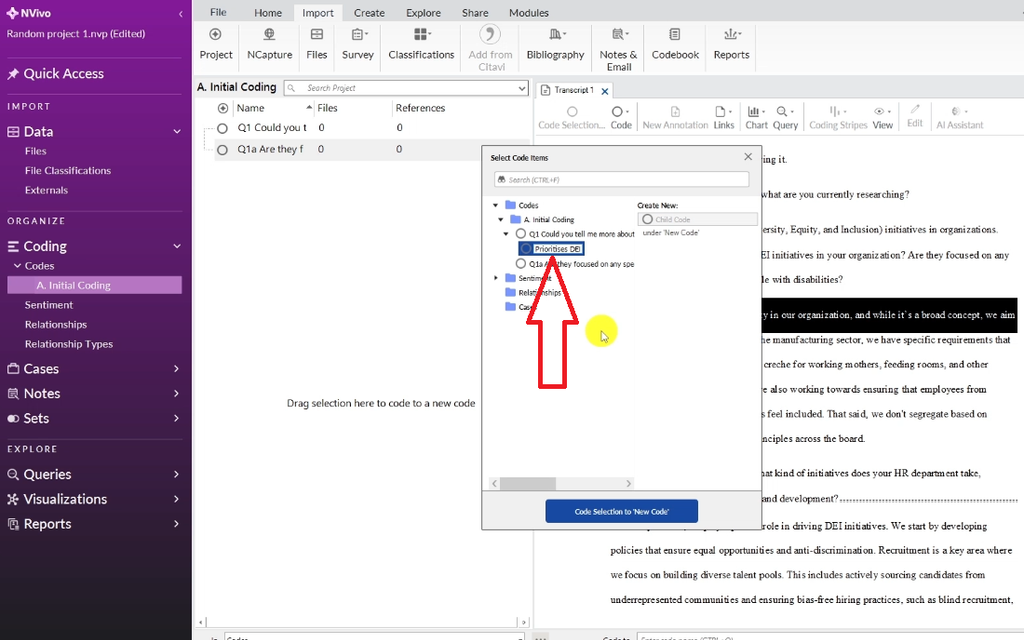
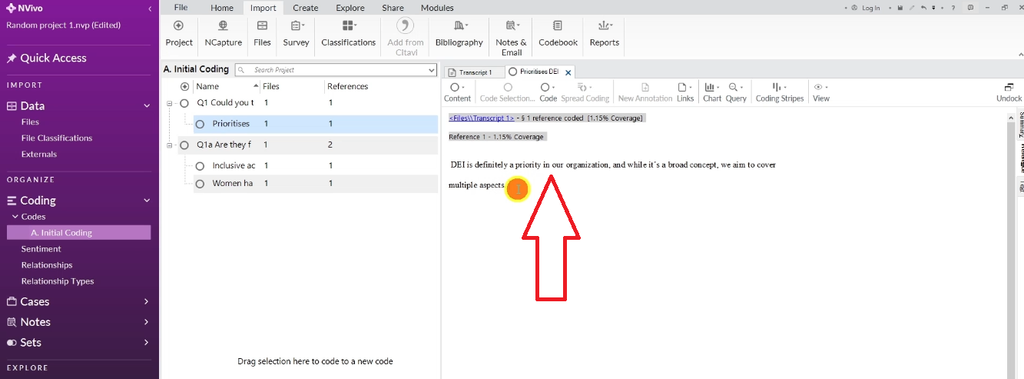
- Highlight the first idea, right-click, and select Code Selection. For “DEI is definitely a priority in our organization… we aim to cover multiple aspects,” I created a code called Prioritizes DEI.
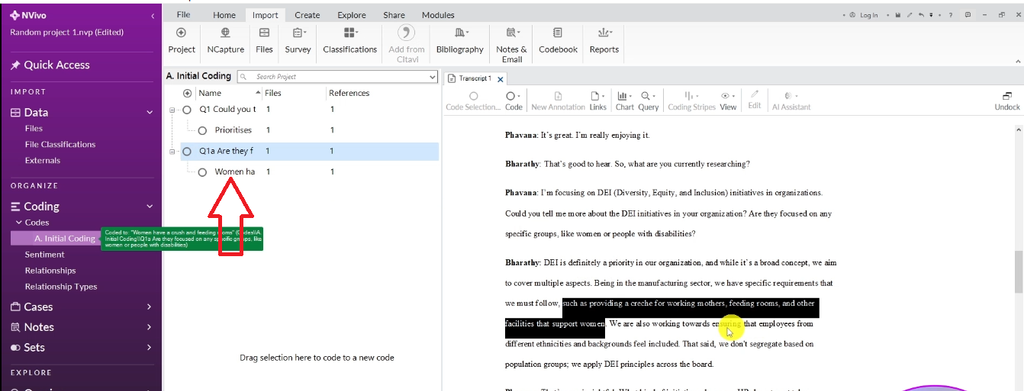
- Highlight the next relevant idea and repeat. For the sentence about providing a crèche and feeding rooms for working mothers, I created Women have a crèche and feeding rooms.
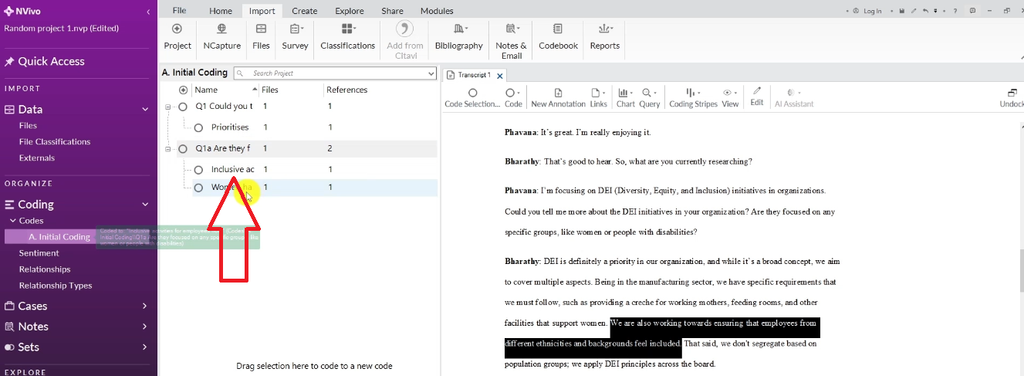
- For the sentence about including employees from different ethnicities and backgrounds, I created Inclusive activities for employees from diverse ethnicities.
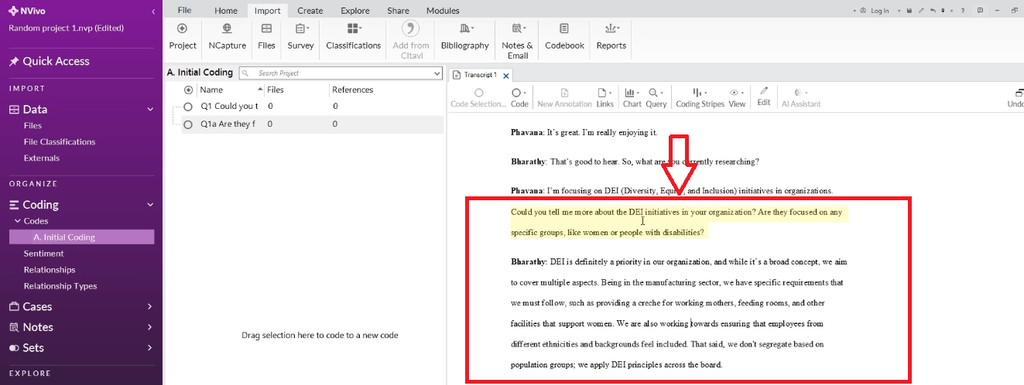
Double-click any code to see exactly which quote it came from — NVivo highlights the original source text, so you can trace every code back to the transcript.
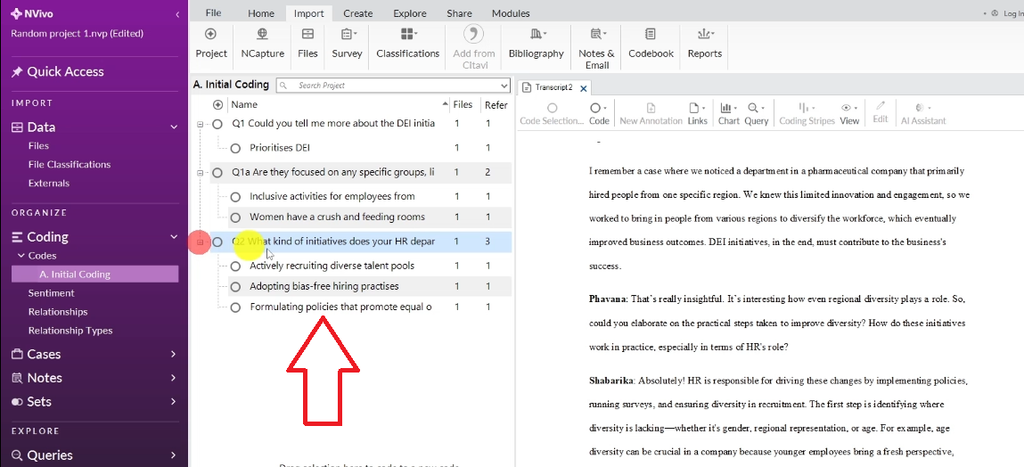
The second interview question asked about HR’s role in recruitment, training, and development. Coding that response the same way produced three more codes: Formulating policies that promote equal opportunities and anti-discrimination, Actively recruiting diverse talent pools, and Adopting bias-free hiring practices.
Keep going until you’ve coded the entire first transcript before moving to the second participant.
How to Manage Codes Across Multiple Participants
Finish coding participant one completely, then move to participant two — using the same code containers you already built, not new ones.
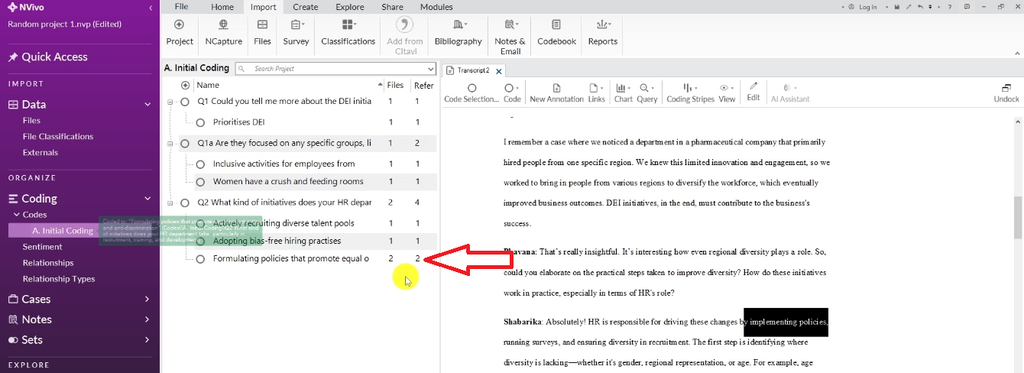
For example, if participant two mentions “implementing policies,” and you already have a code called Formulating policies that promote equal opportunities and anti-discrimination from participant one, drag and drop the new quote into that existing code instead of creating a duplicate. The code now shows two files and two references, meaning two different participants raised the same idea.
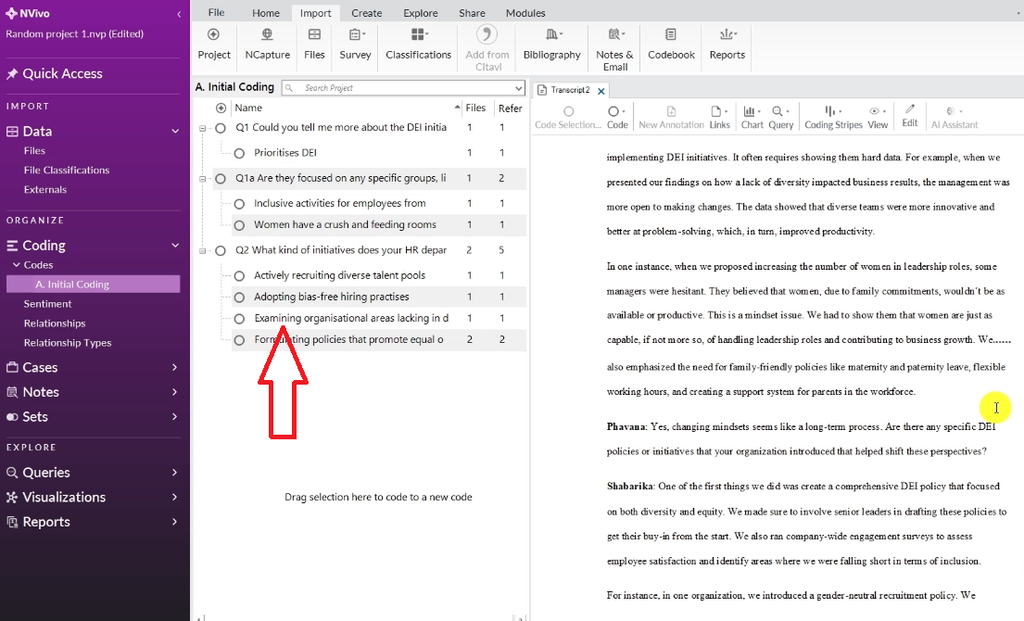
If participant two raises something genuinely new — like identifying where diversity is lacking in the organization — give it its own new code: Examining organizational areas lacking in diversity.
Use View → View All Coding at any point to see every quote you’ve coded so far in one place. It’s a useful sanity check before you move on.
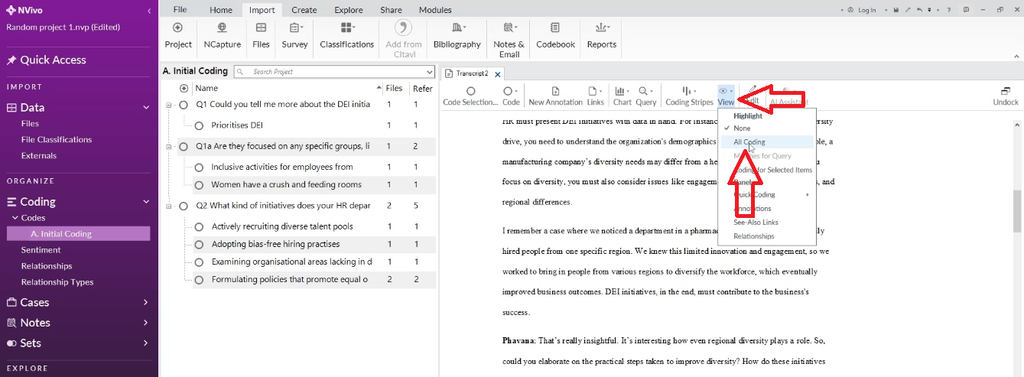
Rule of thumb: if you have 10 participants, finish initial coding for all 10 before moving on to developing themes — Braun and Clarke’s step three.
Frequently Asked Questions
What’s a good dataset to practice NVivo coding on?
Look for publicly shared dissertation or thesis transcripts on repositories like Figshare. They’re realistic and complete, and safe to experiment on since they aren’t your own research.
Do I need my own data to learn NVivo?
No. It’s safer to learn on a practice dataset first, so you can make mistakes without risking your actual project.
What’s the difference between a code and a theme?
A code is a short label attached to a specific piece of data. A theme is a broader pattern you build later by grouping and refining related codes — that’s step three in Braun and Clarke’s framework, covered in Part 2.
Which version of NVivo does this tutorial use?
NVivo 15, the current version from Lumivero.
Why shouldn’t I save my NVivo project to Google Drive or OneDrive?
Cloud sync can conflict with NVivo while it reads and writes project files, which can cause the project to hang or fail to retrieve information properly. Always save to a local drive.
Key Takeaways
- You set up your NVivo project the right way — saved locally, not on a cloud drive.
- You found and imported a free NVivo practice dataset instead of risking your real data.
- You learned Braun and Clarke’s six-step framework, and why skipping familiarization is the mistake that trips up most beginners.
- You completed a real first coding session and kept your codes organized using question containers.
What’s Next: From Codes to Themes (Part 2)
Codes aren’t findings. The real payoff comes from turning the codes you just created into themes, refining them, and exporting a complete findings report — that’s exactly what Part 2 covers.
Before you go, grab the free transcripts, study details, NVivo project file, and codebook I used in this walkthrough. If you’ve just finished your own interviews and don’t know where to start, my free NVivo quick start guide for PhD students walks you through your first five steps.
And if you’ve already got real data waiting and would rather have someone experienced take it from raw transcripts to a finished report, that’s exactly what my done-for-you analysis service is for.